Operating SwiftStack File Access
File Access Architecture
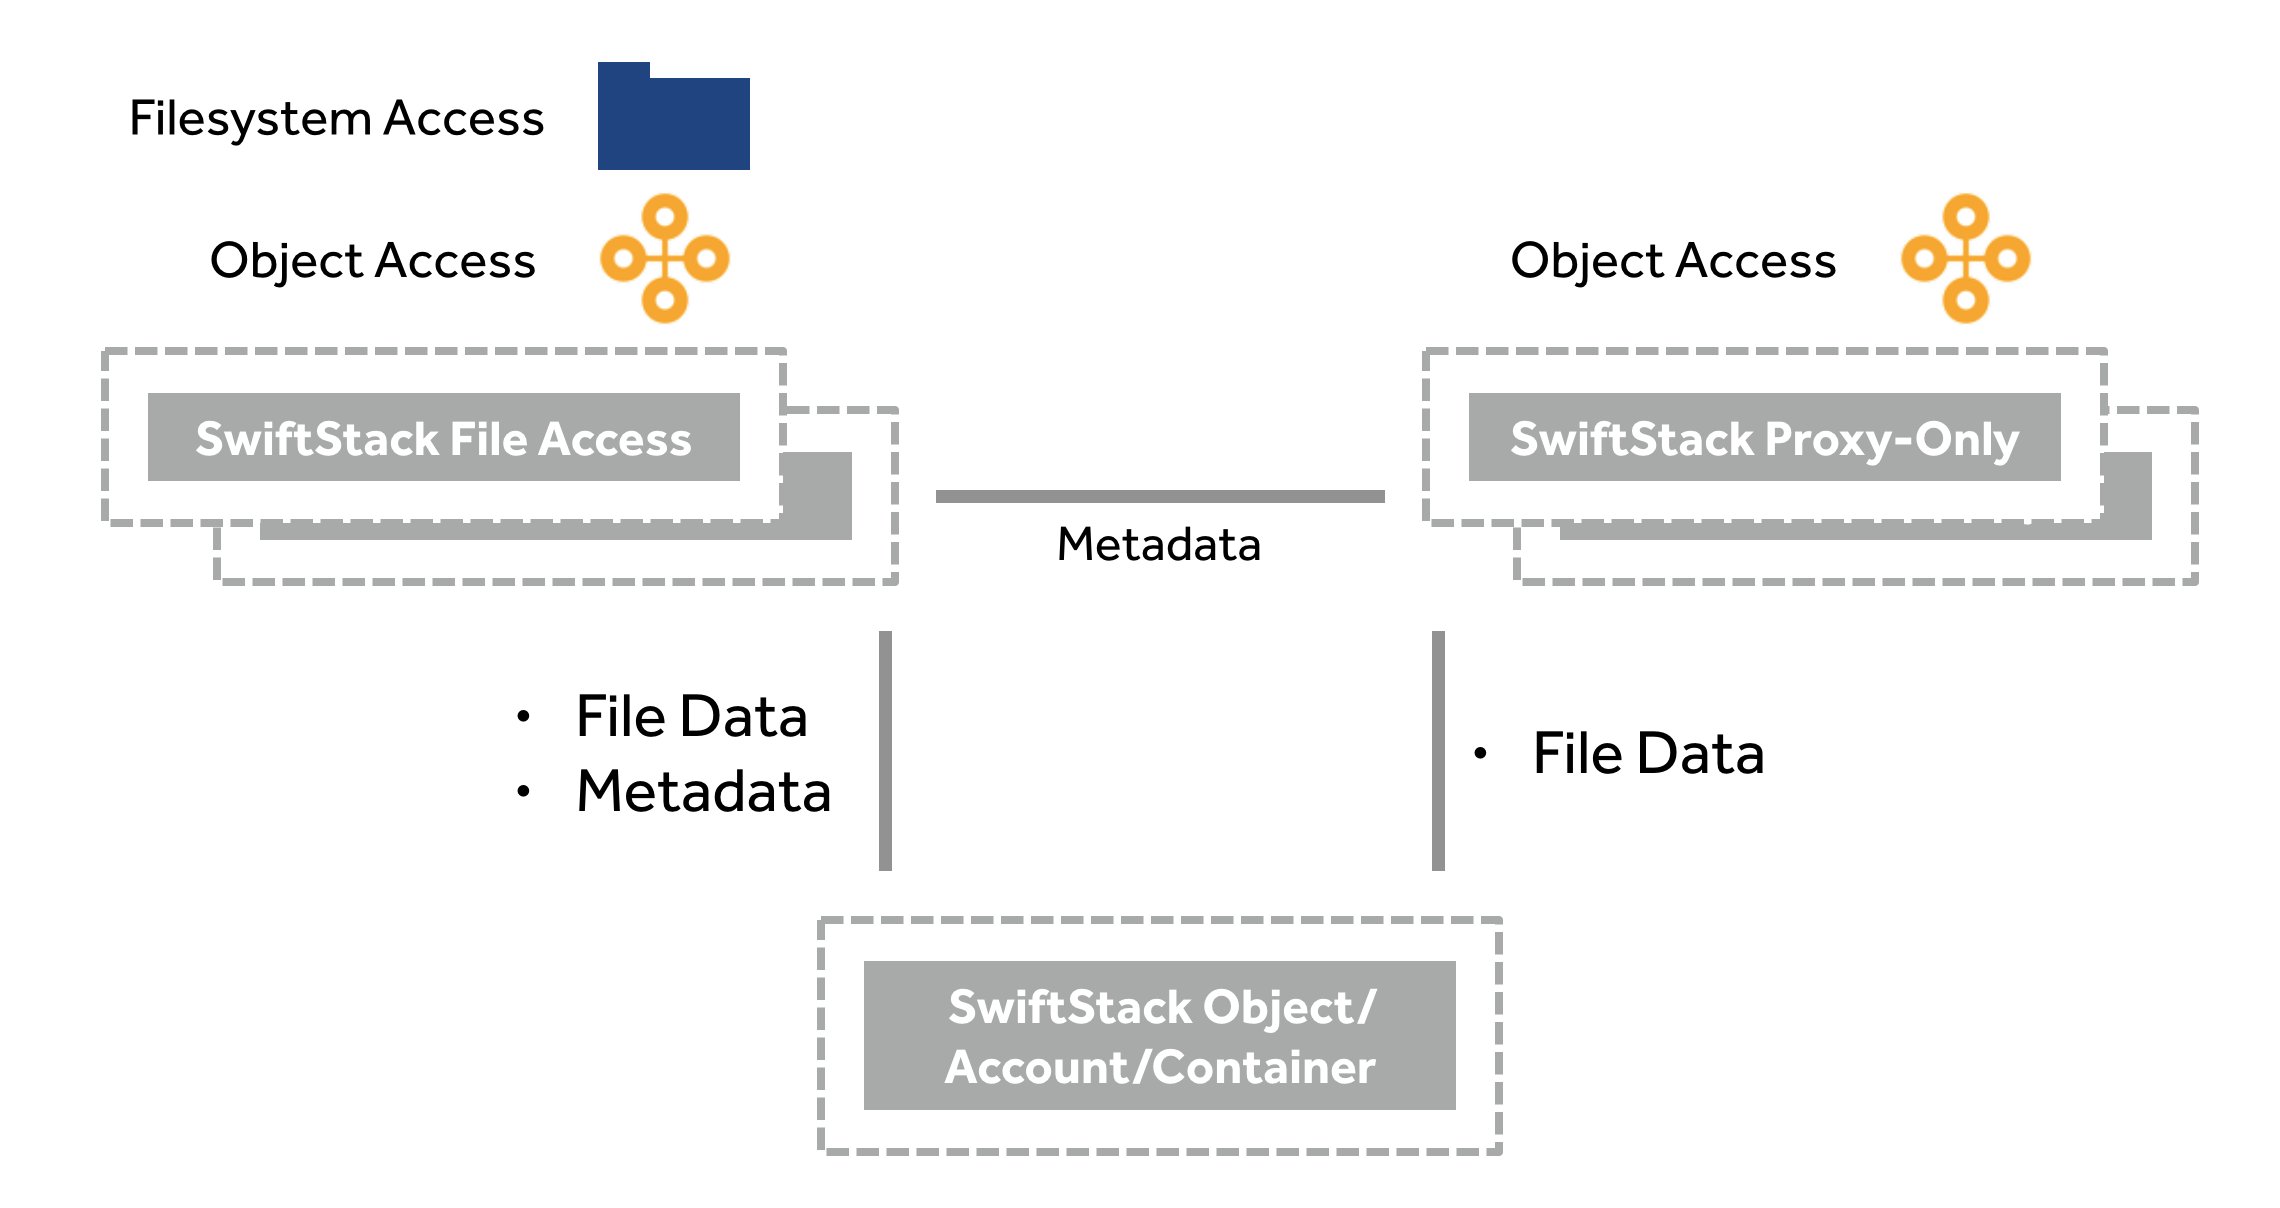
The architecture of SwiftStack File Access enables the same data to be available via object APIs (AWS S3 API and Swift API) while simultaneously be accessible via a filesystem (SMB or NFS).
With SwiftStack File Access, volumes may be exported from operator-specified nodes in the cluster, and object API access will function from any proxy node in the cluster.
An entire Swift Account is used for each File Access volume. Each volume is exported from a File Access node via SMB or NFS. Any Proxy node in the cluster may service object API requests (AWS S3 API and Swift API).
File Access Node Role
To enable File Access, at least one node in the cluster must be provisioned with the File Access node role. The File Access node role can be enabled in the Node Roles page. Note – as with most services, the SwiftStack Controller provides the ability for an operator to separate or combine functions each node should serve in the cluster.
The SwiftStack File Access nodes include both File Access services and object API services. Export both their assigned filesystem volumes via (SMB or NFS) and also provide object API access to any account. Nodes that are provisioned with the Proxy role (which includes “All Services” nodes) and not the File Access role, will need to communicate with the File Access nodes to receive and write metadata to access File Access-enabled Accounts. File/Object data, however will be sent directly to the Object nodes to enable scale-out.
File Access Data
Accounts enabled with File Access utilize an log-segmented object format to store data. Log-segmented objects enable a filesystem to update the data in the filesystem and – at the same time – allow object API access.
When configuring a volume, a storage policy can be configured to determine how data is persisted.
File Access Metadata
Filesystems must enable clients to re-arrange elements of a filesystem tree. This is unlike an object API, which don’t allow objects to be re-named. To facilitate this, filesystem metadata is managed by the assigned node that is exporting the volume.
Filesystem metadata is both cached in system RAM and frequently stored in the SwiftStack cluster. Preserving filesystem metadata in the SwiftStack cluster ensures durability of the filesystem tree and enables portability from one File Access node to another.
When configuring File Access, a Backing Policy can be configured to define which Swift storage policy to store the filesystem metadata separate from the file data.
Configuration Arbiters
Filesystem clients expect a consistent view of the filesystem. To provide this, it is important for the cluster to know which nodes are allowed to update the filesystem metadata for a given volume. SwiftStack File Access configures a subset of the File Access nodes to manage the configuration state. These nodes are indicated with an icon. File Access nodes consult these “configuration arbiters” to ensure that they are servicing the correct volumes.
Do note that SwiftStack Controller will only allow a subset of these nodes to be disabled at the same time.
File Access Configuration
See Installing File Access for a walk through of File Access installation.
Backing Policies
A backing policy specifies the way that SwiftStack File Access will store data in SwiftStack. Storage policies can be configured for file data and filesystem metadata. There are additional advanced configuration options for container usage.
When configuring a volume, a Backing Policy is selected. This allows different volumes to use different storage policies.
- Storage Policy - Defines which policy to use when storing File Access data. This dropdown will be populated by the policies that are defined in SwiftStack Storage Policies.
- Container name prefix - Defines a custom prefix that is added to the containers that are used for this backing policy
- Containers per peer - Defines how many containers are used when distributing File Access data into the cluster.
- Max Objects per container - Defines the number of objects within this backing policy. By default the Containers per peer and the Max Objects per container support one billion objects
Volume Groups
Volume Groups serve two purposes: they provide a single abstraction comprising many Volumes, which all move together when choosing a new node to expose them, and they provide a grouped resource management through the use of read cache weight.
A certain percentage of memory is reserved on each node for a read cache. This is determined by the amount of memory available on the system and its node role. File Access-only nodes will reserve a higher percentage of memory than nodes running more services. The volumes assigned to each Volume Group will share that memory dynamically as needed based on usage.
Each Volume Group has a read cache weight property which defines how much of the relative memory for read cache volumes associated with that Volume Group are allowed to use. So if you have two Volume Groups, A and B, and A has read cache weight 100, and B has read cache weight 200, then the volumes associated with Volume Group A would get ⅓ of the read cache memory and the volumes associated with Volume Group B would get ⅔ of the read cache memory. Please consult with SwiftStack support for recommendations on these settings.
The other properties are controlling how SwiftStack File Access will store data in SwiftStack.
Read cache line size is how much data is pulled from Swift upon any read. If this is set to 1 MiB, then any read of an object will pull in up to 1 MiB of sequential data to store in the read cache. This reduces the need to do frequent, small range-read requests to the SwiftStack cluster.
Snapshots
Snapshots let you view the state of a volume at a specific point in time. Snapshots are incremental, and taking one is instantaneous.
Before we start talking about how to configure them, we need to be familiar with two concepts: snapshot schedules and policies.
A snapshot schedule is a "rule" that tells the system when to take a snapshot and how many of the snapshots that have been taken by that schedule must be kept. We can have hourly, daily, weekly and monthly schedules, and multiple schedules can be set for a single volume.
A snapshot policy groups several schedules together. A single volume can be associated with zero or one policy, and multiple volumes can be associated with the same policy.
Creating a snapshot policy
To create a snapshot policy, navigate to the Snapshots page under File Access and click on the Create New Snapshot Policy button. The new snapshot policy form will be shown:
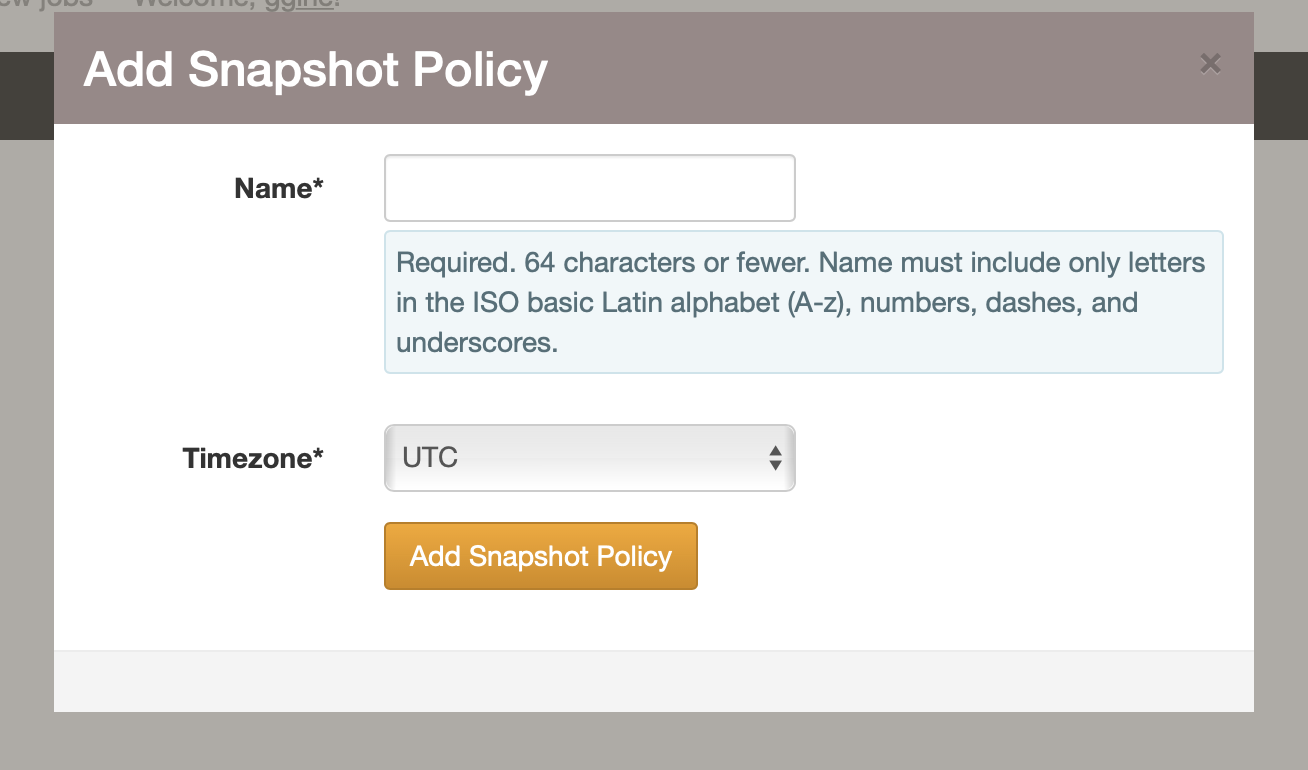
The name field must be unique within your cluster.
Setting the timezone field to your local timezone will let you more easily schedule snapshots at a specific time.
Creating a snapshot schedule
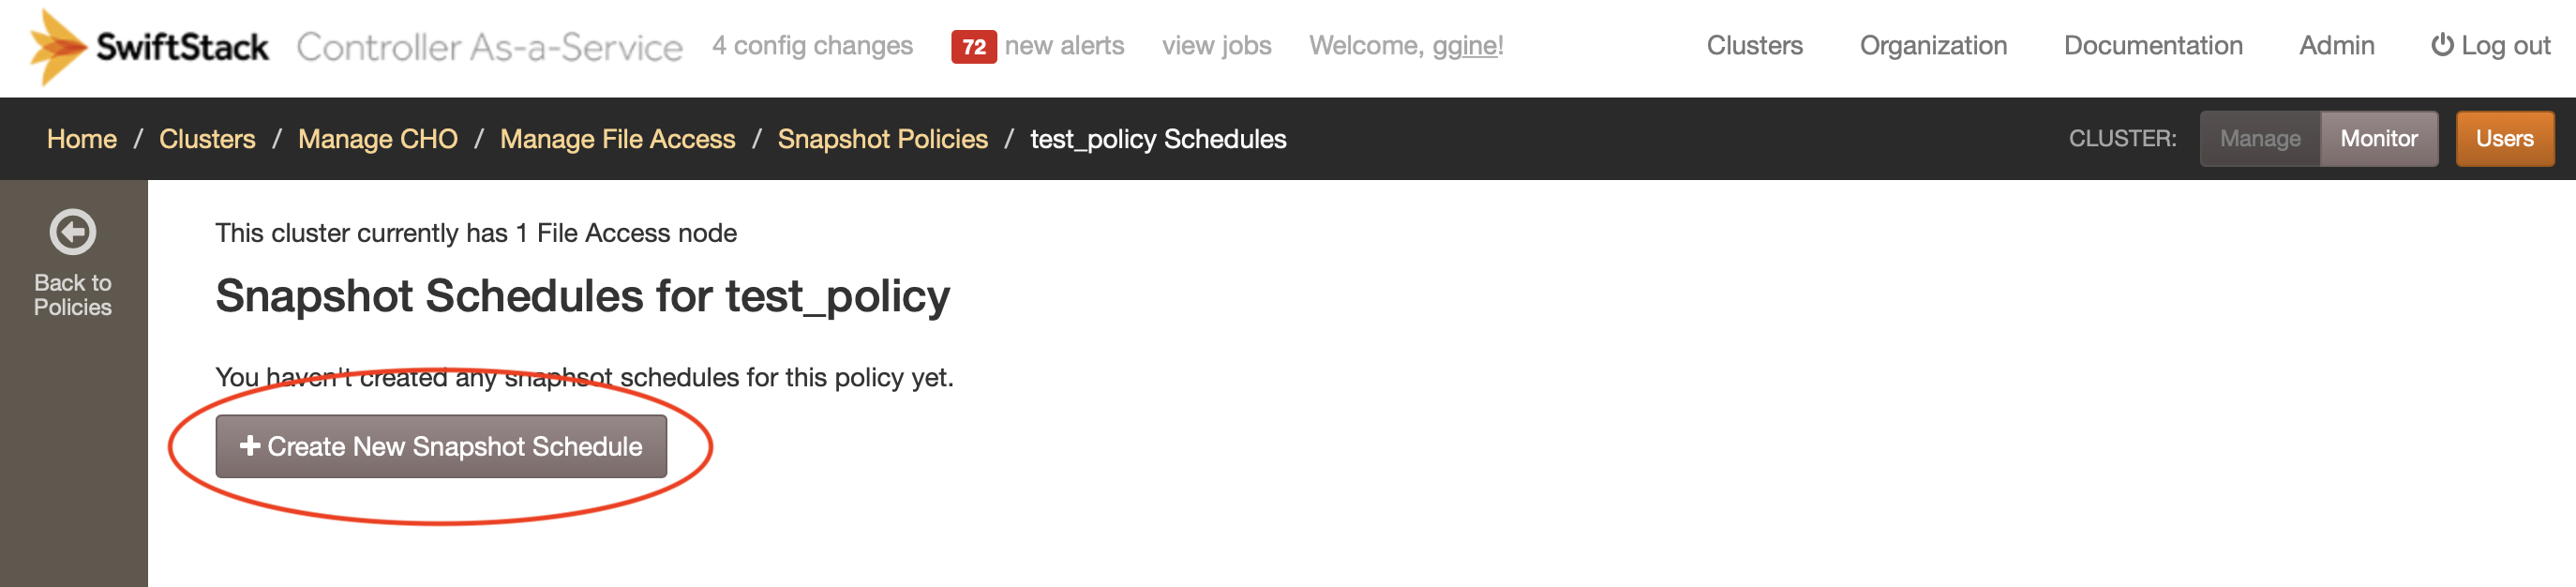
Immediatelly after you create a snapshot policy, you will be prompted to create a schedule for your new policy.
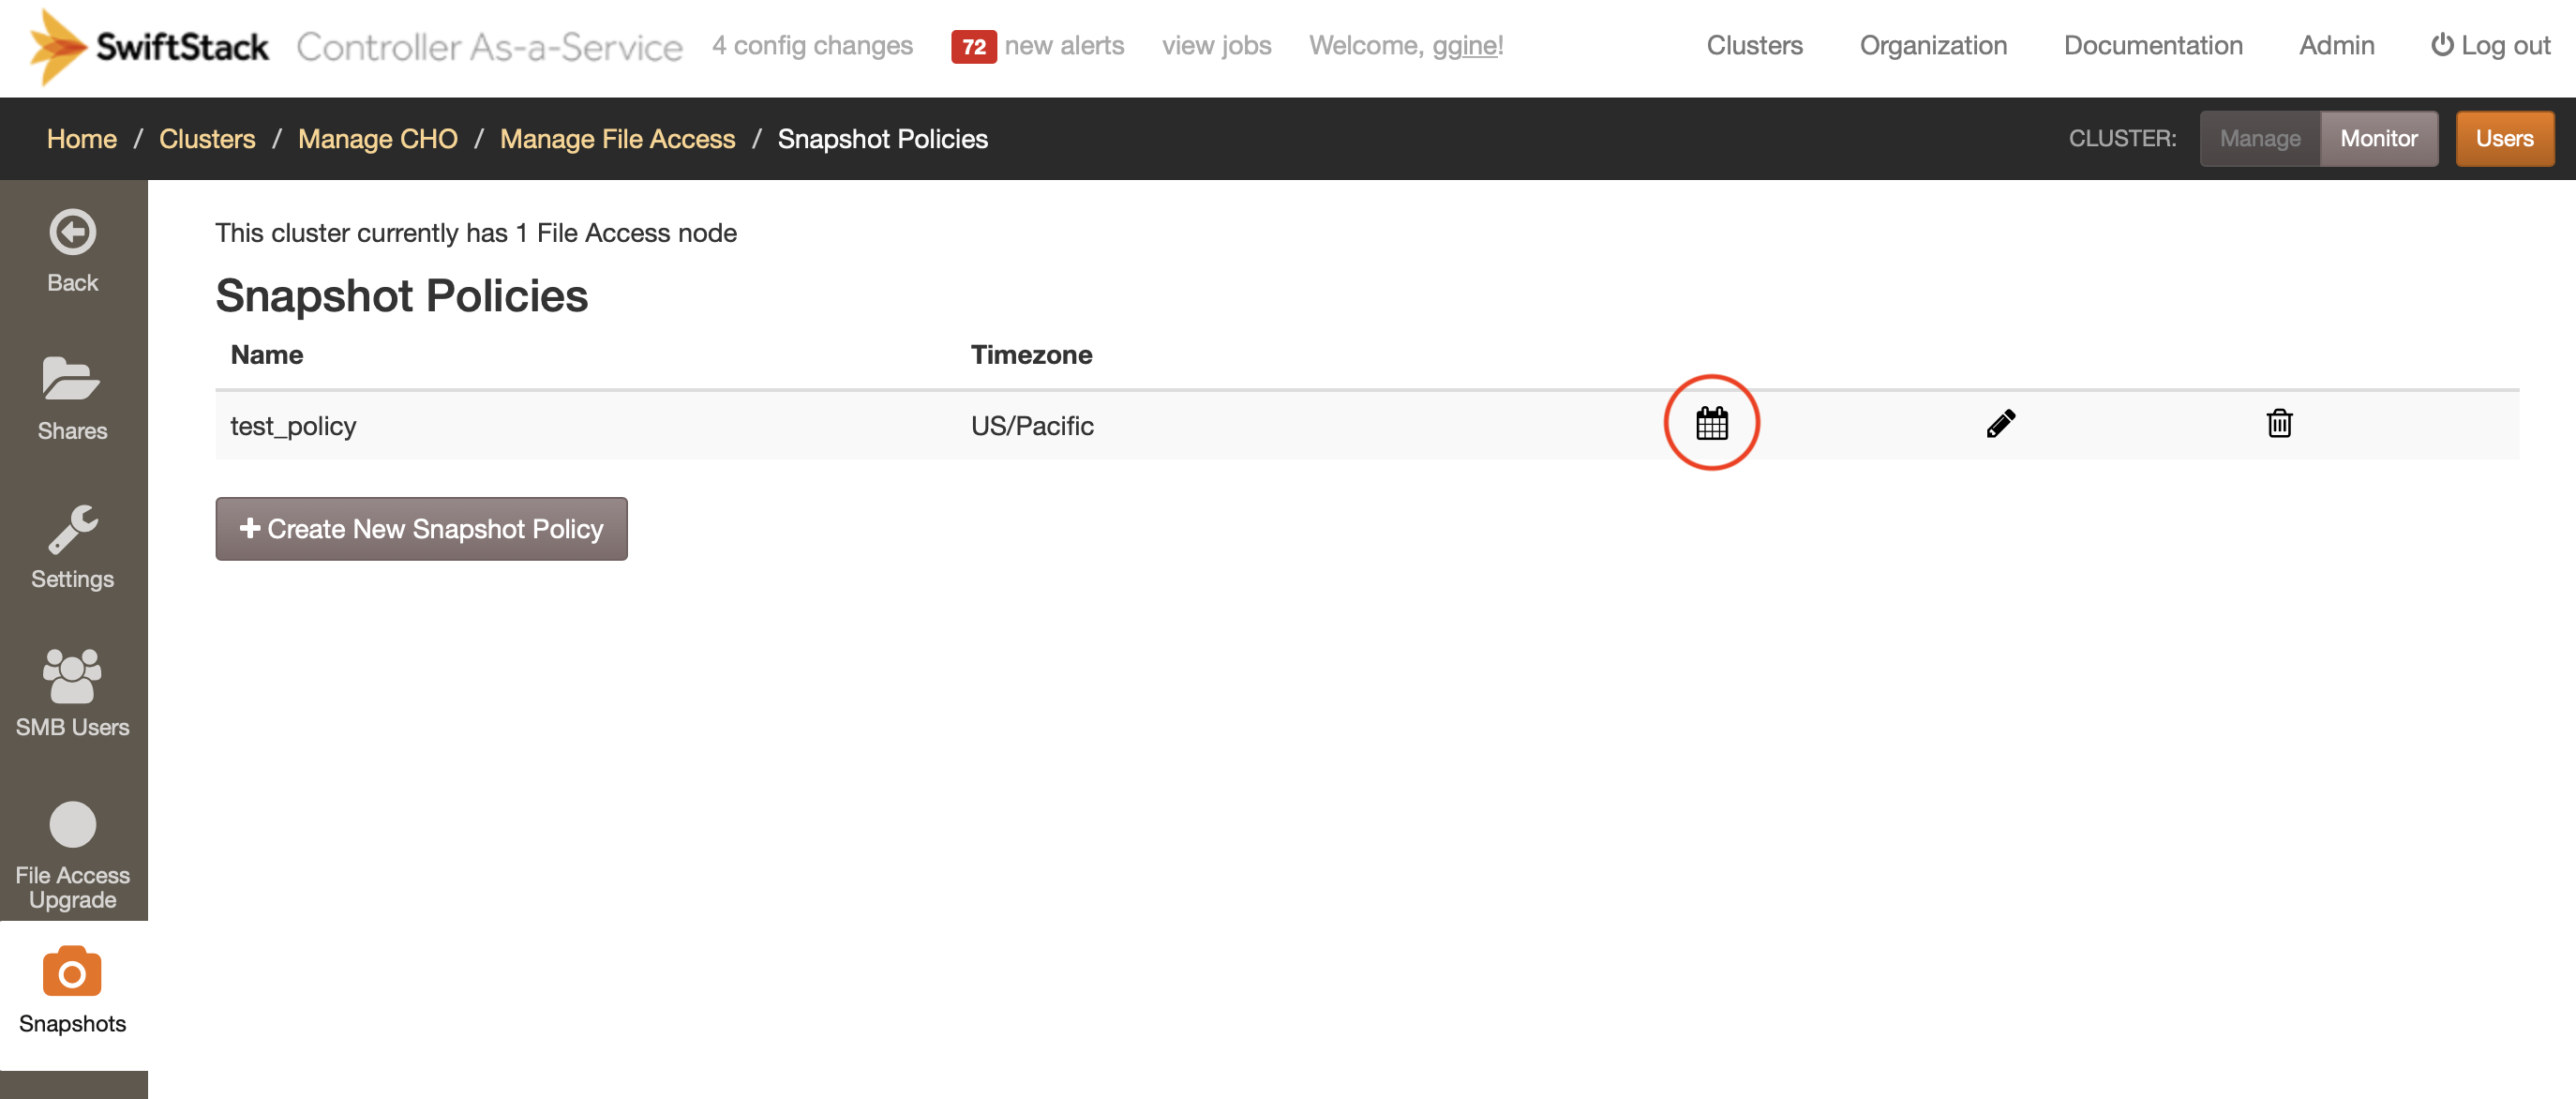
You can always create new schedules by clicking the list of schedules icon for a policy (see image above) and clicking on the Create New Snapshot Schedule button:
You will then be able to set a specific time to create snapshots, as well as how many snapshots will be kept:
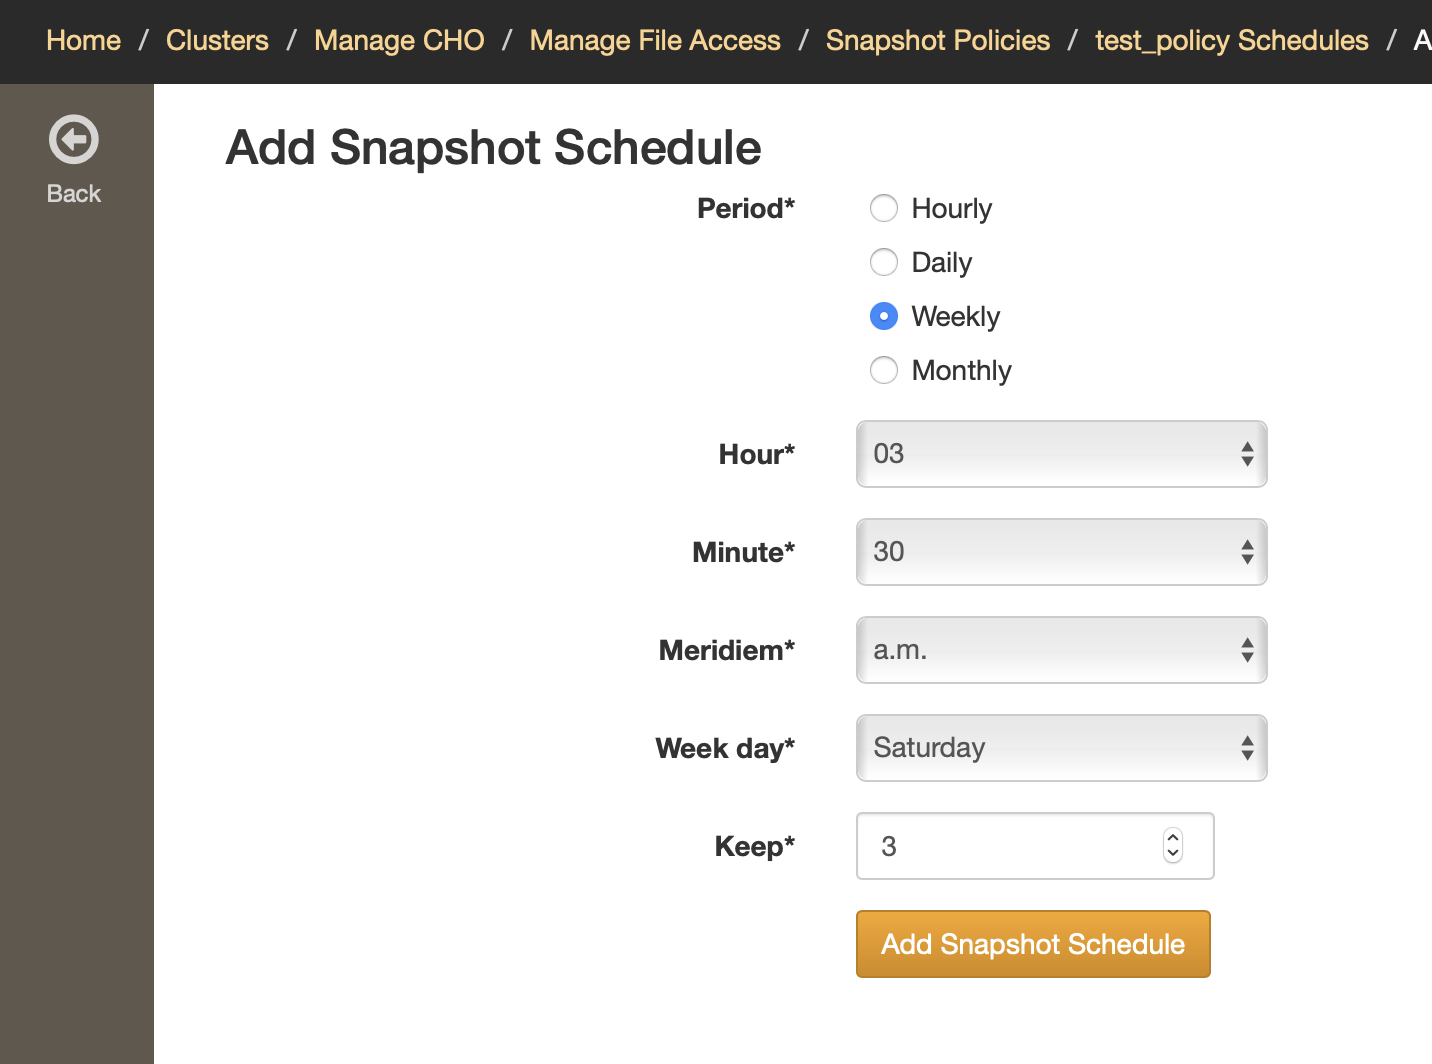
Hourly: a snapshot will be created every hour. The minutes field indicates when exactly within each hour the snapshot will be taken.
Daily: a snapshot will be taken every day at the specified time.
Weekly: one snapshot per week will be taken. You can choose what day of the week, and the specific time to create it.
Monthly: snapshots will be created only once per month. The day of the month as well as the exact time of the day need to be set.
Assigning a snapshot policy to a volume
Creating a policy and its schedules doesn't automatically start creating snapshots; we first need to assign a policy to each volume for which we want to have snapshots created.
Navigate to a volume's Volume Edit page and change the value for its Snapshot policy field:
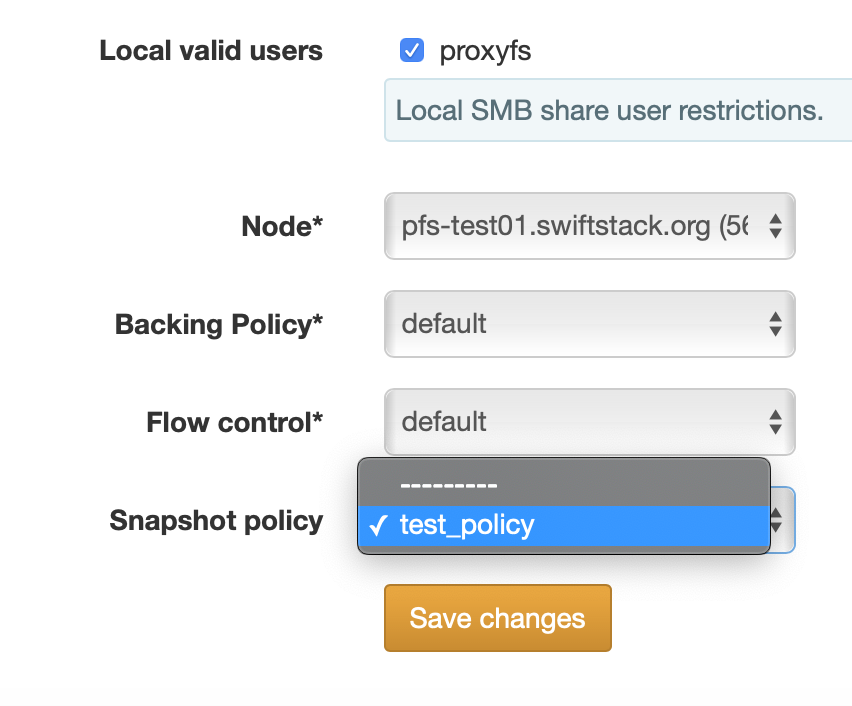
After assigning the policy, push config and snapshots will be taken according to the policy's configured schedule(s).
Accessing a snapshot
After your first snapshot is taken, a special directory named .snapshot is
created at the root of your volume (under Swift's point of view, we would call
it a container). In this directory, you'll find all your snapshots, named after
the date and time they were taken. If you browse into them, you will be able
to see everything exactly as it was at the time of taking the snapshot.
Snapshots can be accessed using File Access protocols (SMB and NFS) as well as Swift and S3.
[root@pfs-test01 ~]# cd /mnt/nfs_proxyfs_mount/

[root@pfs-test01 nfs_proxyfs_mount]# ls -lah
total 0
drwxrwxrwx. 4 root root  0 Oct 16 12:09 .
drwxrwxrwx. 4 root root 56 Jan 30  2018 ..
drwxr-xr-x. 3 root root  0 Oct 16 12:10 bar
drwxr-xr-x. 3 root root  0 Oct 16 12:26 foo
dr-xr-xr-x. 4 root root  0 Oct 16 12:09 .snapshot

[root@pfs-test01 nfs_proxyfs_mount]# ls -lah .snapshot/
total 0
dr-xr-xr-x. 4 root root 0 Oct 16 12:09 .
drwxrwxrwx. 4 root root 0 Oct 16 12:09 ..
dr-xr-xr-x. 4 root root 0 Oct 16 12:09 2018-10-18T17.45.00-07.00

[root@pfs-test01 nfs_proxyfs_mount]# ls -lah .snapshot/2018-10-18T17.45.00-07.00/
total 0
dr-xr-xr-x. 4 root root 0 Oct 16 12:09 .
dr-xr-xr-x. 4 root root 0 Oct 16 12:09 ..
dr-xr-xr-x. 3 root root 0 Oct 16 12:10 bar
dr-xr-xr-x. 3 root root 0 Oct 16 12:26 foo
Please note snapshots are read only.
Additional Settings
There are additional configuration settings under Settings in the File Access section of the SwiftStack Controller. There, you will find additional configuration for various port settings under Interface Settings and additional configuration settings under Persistence Settings covered in Troubleshooting.
File Access Operations
Moving a Volume
Volumes are moved as part of moving a Volume Group, which may be done via the SwiftStack Controller. This may be done if a node is to undergo maintenance, or be removed from the cluster. It is always advisable to move shares first before disabling or decommissioning a node.
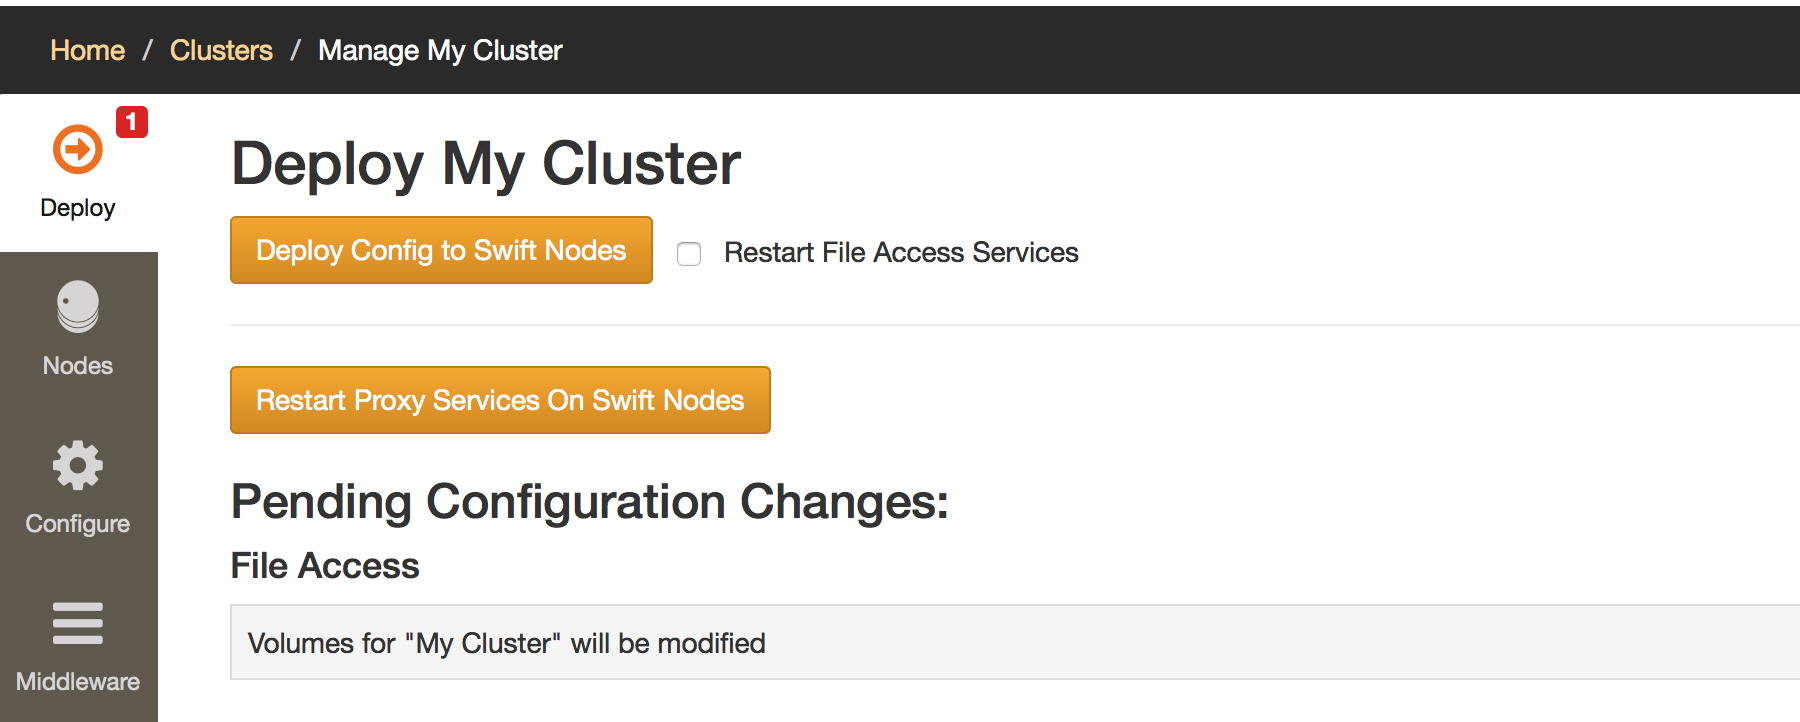
To move a volume group, navigate to the Shares tab, click the edit icon, and select a new node.
Then click Click Here to Deploy to navigate to the deploy configuration page.
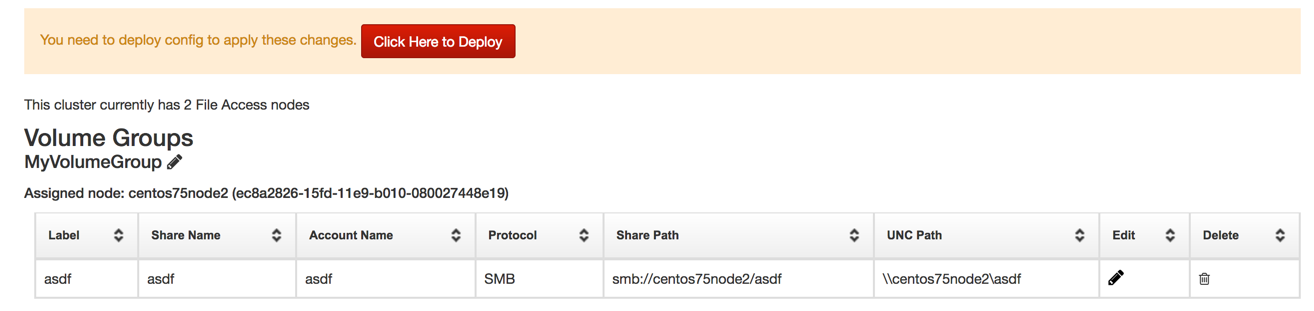
And click Deploy Config to Swift Nodes
Disabled Nodes with File Access
It’s important to ensure that the File Access nodes do not service a volume it is not supposed to.
To disable a File Access node, first move the volumes from that node.
To ensure that a node is serving the correct volumes, the following sequence is performed when the volume is enabled on a node when it starts up. First, the node will try to contact its SwiftStack Controller to verify its configuration. If it is unable to contact the Controller, it will next contact a quorum (strict majority) of Configuration Arbiter nodes and receive back affirmation that its config is up to date before starting to serve a volume. An arbiter is allowed to count itself amongst positive responses. If the majority of the arbiter nodes do not agree on the current up-to-date configuration, the volumes will not start.
However, if a File Access node does go offline and the node will not be repaired, the node may be disabled from the cluster. Before a node disablement occurs, it is important to ensure that the node is offline and will remain offline.
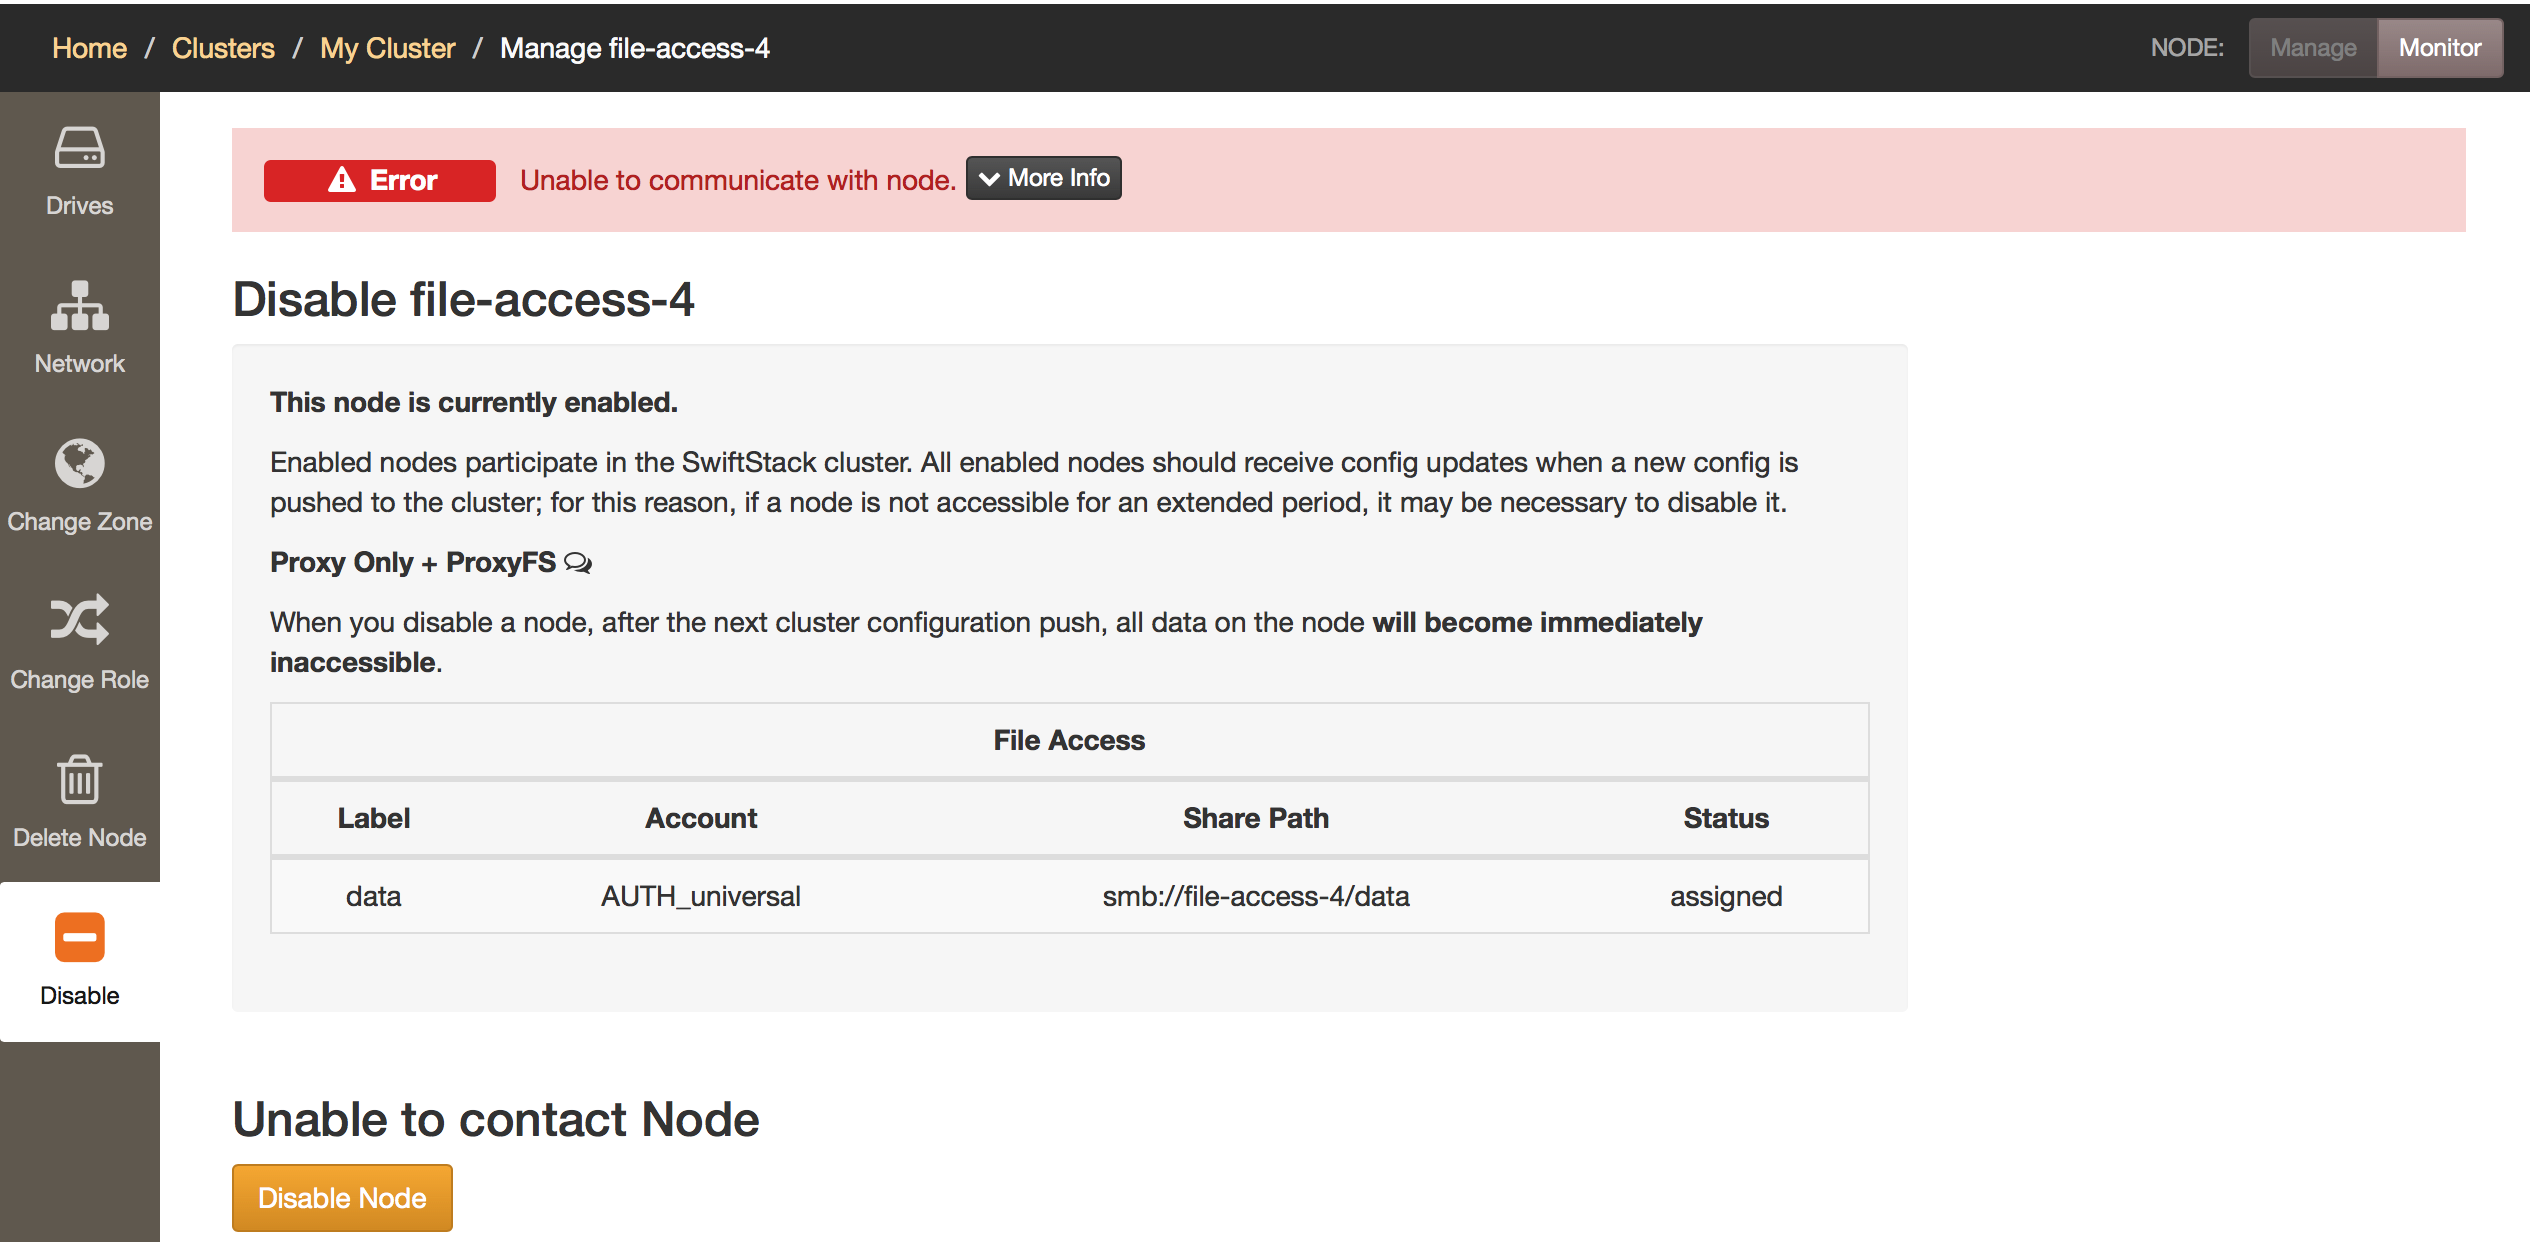
Confirmation – ensure that node is offline.

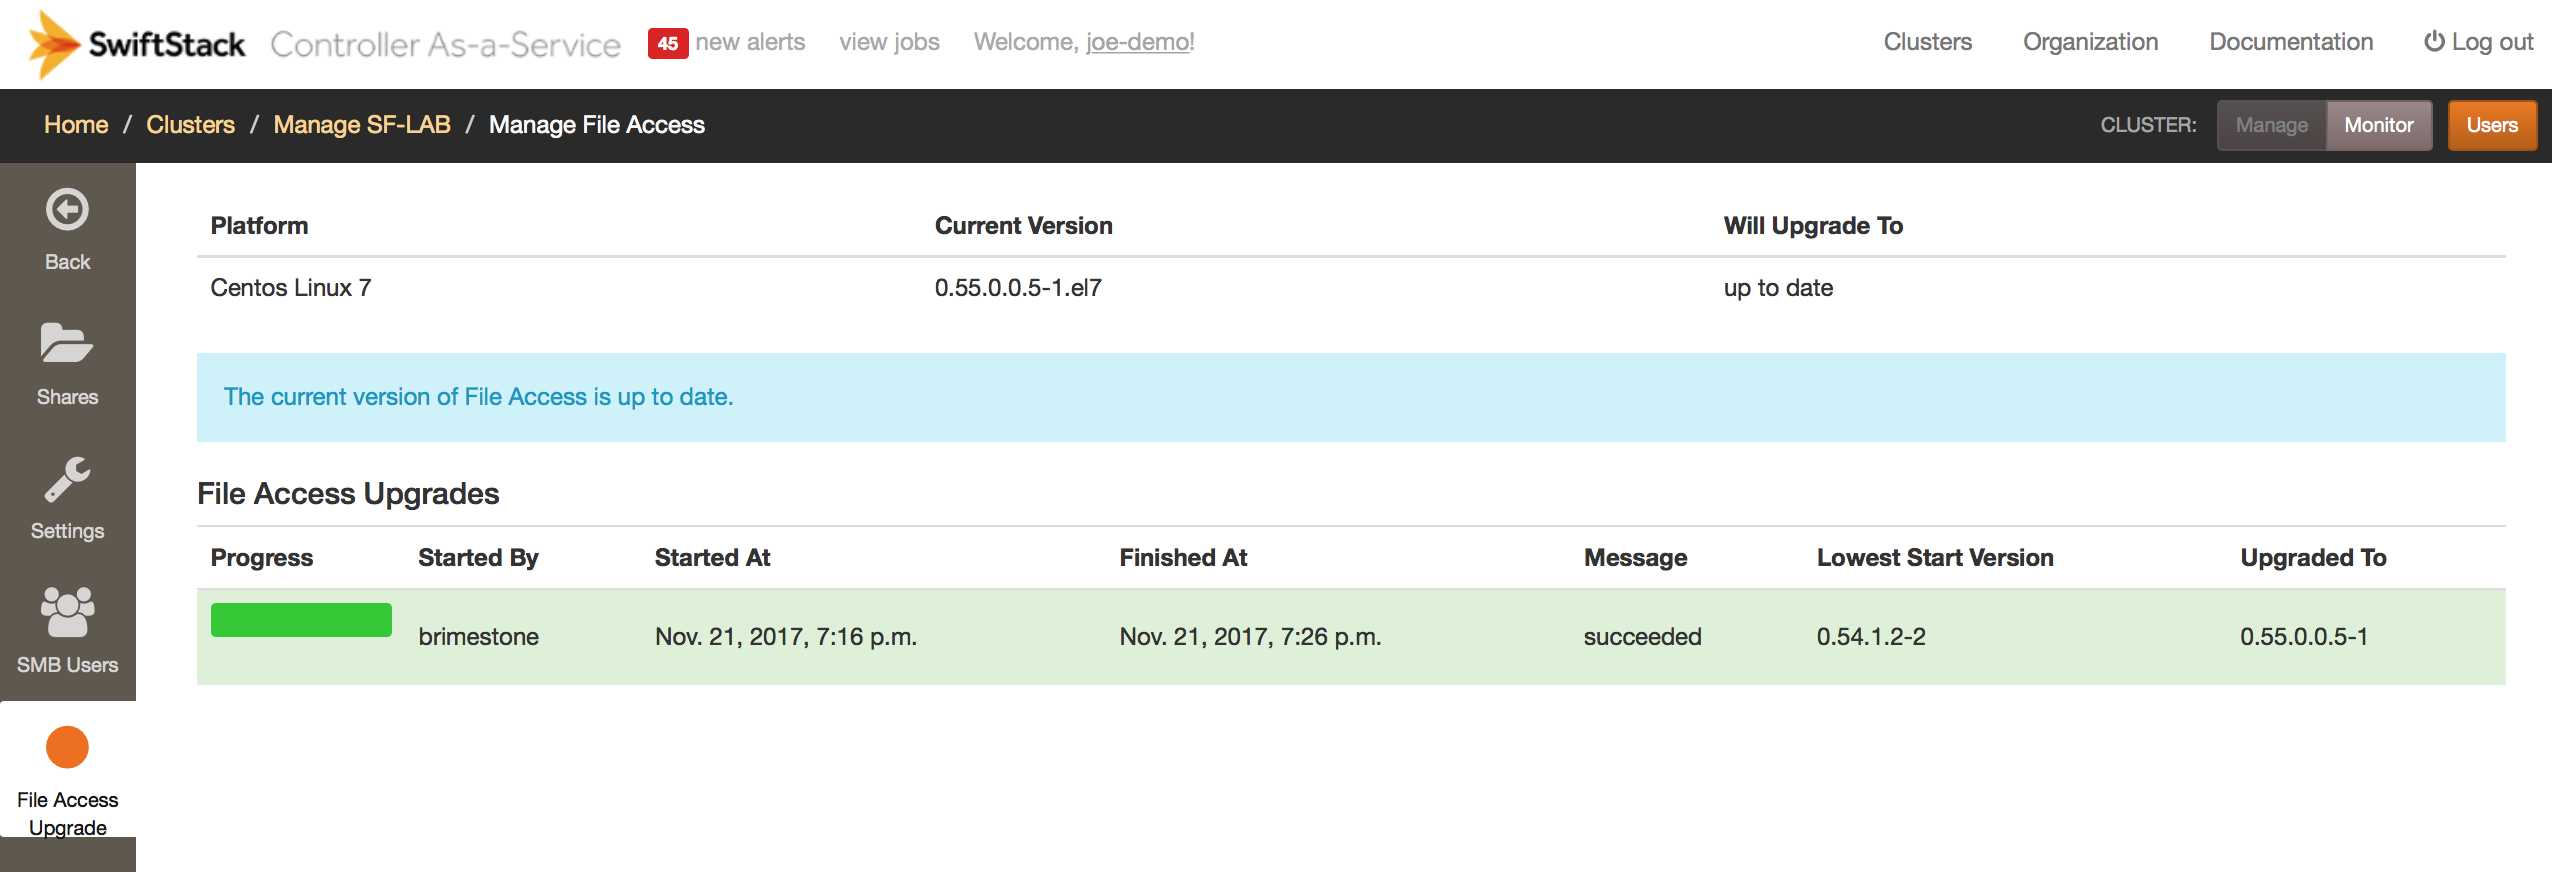
File Access Upgrade
File Access runtime can be upgraded separately from the Swift. If there is a newer version available than the version deployed on your cluster, you have the option to do a rolling upgrade.
Troubleshooting
Running ssdiag on the node will check for ProxyFS running. See Node Commands
The ProxyFS log is located in /opt/ss/var/log/proxyfsd.log on the node.
ProxyFS will not start on nodes that have IPv6 disabled.
For example, errors in the ProxyFS log with “failed after 6 attempts” indicate that there were issues writing to the swift API storage target. This will result in a client error (appropriately so!) when it can’t write to swift after the configured retry number. Adjusting retry and connection pools may be useful for some use cases and can be adjusted in Settings / Persistence Settings in the File Access section of the Controller.
Retry and backoff
There are separate retry values for object operations and others (containers and accounts).
For example, the default initial delay before an object retry is 1 sec. If that first retry fails the system will wait 1 sec * 2.0 or 2.0 sec before trying again. The system will attempt 5 retries (plus 1 for the original request to get 6). If the 4th retry fails the system will wait 1 sec * 2.0^4 = 16 sec. So the total of all the retry requests is with the default configuration is approximately 31 sec.
Connection Pools
The chunked/non-chunked connection pool sizes define the number of simultaneous connections for different operations.
The ProxyFS process maintains long-running PUT connections to Swift for files that are being written to actively; these are the "chunked" connections. In effect, the number of chunked connections allowed limits the number of files that can be written to simultaneously.
The non-chunked connection pool limits the number of simultaneous connections for any other interactions with swift; these are mostly short-term and one-off, so the default here is lower.
For smaller systems, a starting point for “Swift non chunked connection pool size” should be 4 x number of drives. Larger, production systems should use the default configuration.
On low-memory systems, the “chunked connection pool” x “Max Flush Size” shouldn’t exceed the amount of RAM available to buffer writes. On high-memory systems, default configuration should be used.