Automated Provisioning
Overview
Automated provisioning allows nodes to be configured without human intervention. By providing certain configuration values to the SwiftStack Controller, your nodes will be walked through the various steps of configuration without requiring you to access the web GUI and make choices manually.
Limitations
Currently, automated provisioning does not enable nodes nor initiate the first configuration push to the cluster. Support for automatically enabling nodes will be added in future releases.
How It Works
When a node is registered with the Controller, it will look for a file
on disk at the location /etc/ssnode-claim.conf. If that file exists,
it will read it and send the information therein along to the
Controller. The Controller will then save this information and mark
the node for automated provisioning.
Warning
A node that is on the automated provisioning path may not be configured manually until automated provisioning has finished.
The provisioning process will then proceed on the Controller, and after some time (no more than 10 minutes under normal circumstances) your node should be in its desired state.
Configuring SwiftStack Automated Provisioning
Prerequisites
In order to create a Machine Profile, there must already exist a cluster to attach it to.
Any Storage Policy you wish to assign drives to must exist before creating the Device Assignment Rules, and its index must be known. By default, each cluster contains a default storage policy called Standard-Replica with an index of 0.
In order to execute automated provisioning on a node, the Region and Zone to which the node will be added must exist in the cluster's configuration.
Optionally, the cluster should include Network Rules. If appropriate rules are not available, or fail to apply, the network interfaces will need to be set manually before enabling and pushing config to the node(s).
Machine Profiles and Device Assignment Rules
Machine profiles are required to automatically ingest your nodes and are configured with device assignment rules that specify how storage devices on your nodes should be formatted and assigned to policies.
To create a machine profile, go to your Organization page, and click the tab labeled Profiles.
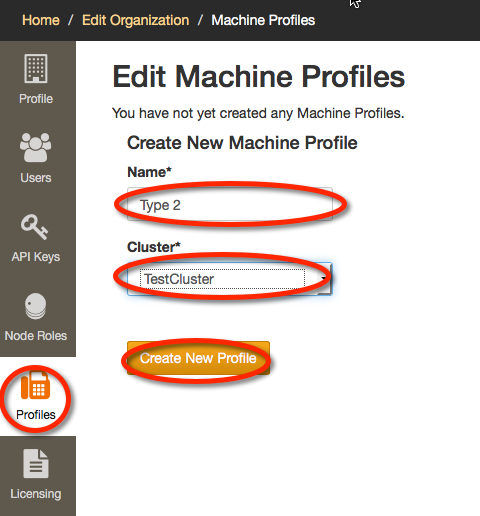
On this page you can manage machine profiles. Choose a name and a cluster for your new machine profile, and click Create New Profile to create it.
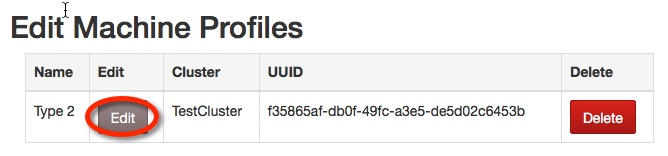
You will see a new table entry for your new machine profile. Click the Edit button. On the ensuing page, you will have a text area in which you can establish device assignment rules in a JSON format which is described below. You may prefer to first consult the example in the subsection after next before going back to read the more formal specification presented in the next subsection.
Device Assignment Rule Specification
The device assignment rules for a machine profile are specified in JSON as an array of objects, each of which represents a device assignment rules, in order of decreasing priority.
Each rule object has the following attributes:
| key | value |
|---|---|
| name | The name of the rule |
| predicates | An array of device assignment predicates as objects, as described below. |
| assignments | An array of device assignments as objects, as described below. |
The device assignment predicates for a rule, taken together, specify when the set of drives for a node are determined to match a rule, resulting in that node's drives being formatted and assigned policies in accordance with the rule's assignments. Device assignment predicate objects have these attributes:
| key | value |
|---|---|
| device_class | A device class as an object, as described below. |
| quantity | The number of devices needed. |
Device assignments have these attributes:
| key | value |
|---|---|
| device_class | A device class as an object, as described below. |
| quantity | The number of devices needed. |
| policies | An array of the integer storage policy indices
that these devices should belong to, with the
Account/Container policy represented as null. |
Device classes have these attributes:
| key | value |
|---|---|
| gb | The approximate size of the drive as integer in gigabytes. |
| ssd | true if this class represents a solid-state
drive, otherwise false |
| tolerance | A floating-point number indicating how close a
drive's recorded size has to be to the gb
attribute of this class in order for it to be
considered a member of the class. If omitted,
defaults to 2.0 GB. |
Note
As you may have noticed, manually composing JSON to specify device assignment rules can be somewhat complex and error-prone. A more intuitive user interface for creating device rules will be incorporated in a future release.
Device Assignment Rule Specification Example
Suppose you have machines with two different kinds of hardware that you want to make into SwiftStack nodes: some of the machines have ten 100 GB spinning disks, all of which you want to be in storage policy 0 and the Account/Container policy, whereas the others have eight 149.8 GB SSDs, five of which you want to be in storage policies 0 and 1, and three of which you want to only be in storage policy 1. You might then create a rules specification like this:
[
    {
        "name": "My First Rule",
        "predicates": [
            {
                "device_class": {"gb": 100, "ssd": false},
                "quantity": 10
            }
        ],
        "assignments": [
            {
                "device_class": {"gb": 100, "ssd": false},
                "quantity": 10,
                "policies": [null, 0]
            }
        ]
    },
    {
        "name": "My Second Rule",
        "predicates": [
            {
                "device_class": {"gb": 150, "ssd": true},
                "quantity": 8
            }
        ],
        "assignments": [
            {
                "device_class": {"gb": 150, "ssd": true},
                "quantity": 5,
                "policies": [0, 1]
            },
            {
                "device_class": {"gb": 150, "ssd": true},
                "quantity": 3,
                "policies": [1]
            }
        ]
    }
]
How To Set Up Nodes for Autoprovisioning
There are two ways to set a node up for automated provisioning. The first is to place the information in /etc/ssnode-claim.conf yourself. The second is to specify all the necessary information to the installation endpoint, which will then write it out to your filesystem.
The information you can provide for automated provisioning follows.
| Parameter | Description |
|---|---|
| user_key | The API Key of a user in your organization. The user this corresponds to must be authorized to ingest nodes. |
| node_role | The name of a Node Role in your organization to ingest this node as (e.g. All Swift Services) |
| machine_profile | The name of a Machine Profile in your organization to associate this node with. |
| region | The name of the Region to place this node in. Must be in the same cluster that the Machine Profile is associated with. |
| zone | The name of the Zone to place this node in. Must be in the Region specified above. |
Note
You may wish to create a special account specifically for automated claim; that way, all your nodes in automated provisioning are associated with a unique service account, rather than one of your team members.
Configuration Requirements
The parameter user_key must be provided, and must be a valid API key for a user in your organization. If user_key is the only information provided, the node will simply be claimed to your organization automatically, but no further provisioning can be done.
In order to ingest a node, the Controller needs three pieces of information: the node's Role, the Cluster to ingest it into, and what Zone/Region to place it in. If all of these parameters are provided, the node will also be ingested.
Note that the Cluster is not provided directly but rather through the Machine Profile.
Examples
Set Up
Suppose you have the following set up on your controller: a user with the API key 0000abcdef0000abcdef0000abcdef0000abcdef, the Node Role All Swift Services enabled, a Machine Profile named My Profile, and Zone 1 set up in Region 1.
Conf File
The first way to automatically provision this node is to place the following content in /etc/ssnode-claim.conf before installing the Node Agent:
[ssnode_claim]
user_key = 0000abcdef0000abcdef0000abcdef0000abcdef
node_role = All Swift Services
machine_profile = My Profile
region = Region 1
zone = Zone 1
Then, when the Node Agent is installed, the node will be automatically claimed, then ingested into the cluster the Machine Profile is associated with, in Zone 1, with the role All Swift Services. Remember that this process will take some time.
Automated Install Endpoint
Alternatively, you could take those parameters and send them as query
parameters to https://platform.swiftstack.com/install_with_claim/. Make sure you
remember to URL encode the parameters and put the url in quotes if you
choose this route. For this example, you would want to use a command like
curl -1 "https://platform.swiftstack.com/install_with_claim/?user_key=0000abcdef0000abcdef0000abcdef0000abcdef&node_role=All%20Swift%20Services&machine_profile=My%20Profile®ion=Region%201&zone=Zone%201"
Instead of the install endpoint you might be more used to,
curl -1 https://platform.swiftstack.com/install