SwiftStack Metadata Validator
SwiftStack Metadata Validator allows you to create and apply restrictions on the type and content of object metadata entering your SwiftStack cluster. It does this by validating object metadata against a JSON Schema.
To use SwiftStack Metadata Validator, you tag an account, or a bucket/container, with the location of a JSON schema. Once you have tagged an account or container, attempts to set or modify the metadata of any objects within them must conform to the schema you specify, or the SwiftStack cluster will reject the operation.
Note
Deploying SwiftStack Metadata Validator requires at least SwiftStack version 6.7.0.1, and will alter the behaviour of your SwiftStack cluster.
Before doing so, please contact support to discuss your needs with our Professional Services team.
SwiftStack Metadata Validator Components
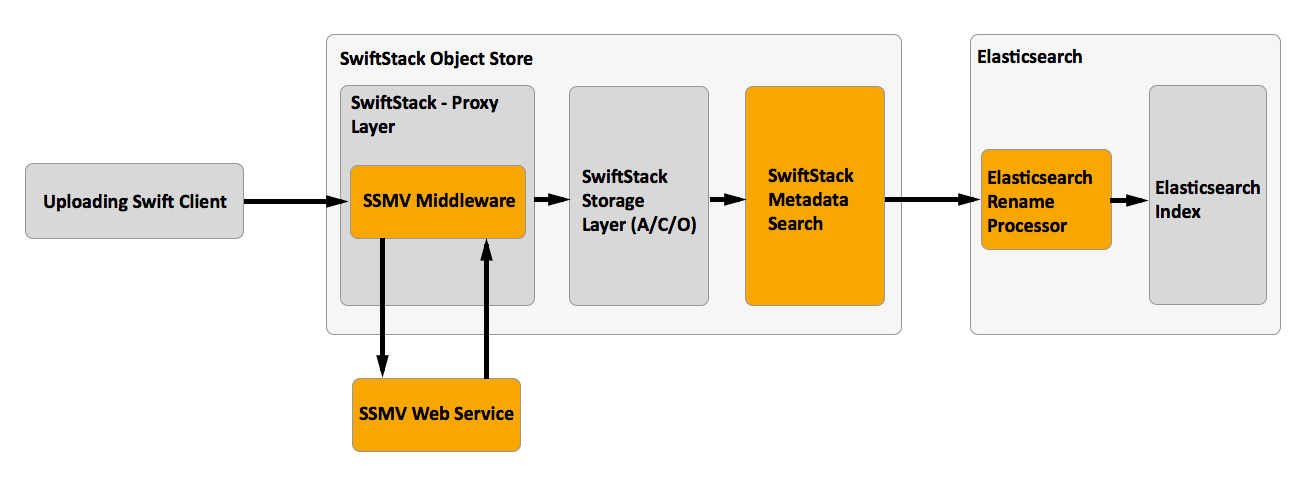
The validator itself consists of two components:
- A Web Service, which performs validation;
- Some Middleware which intercepts object API requests that can alter object metadata, and forwards them on to the web service for validation.
SwiftStack Metadata Validator and Metadata Search
SwiftStack Metadata Validator can be deployed with or without SwiftStack Metadata Search.
When you install the metadata validator alongside Metadata Search:
- Your Elasticsearch cluster will be reconfigured with a Rename Processor Pipeline.
- We recommend that your Metadata Search Mappings have the Parse JSON option enabled, and the Pipeline option set to the name of the Rename Processor Pipeline - "ssmv-rename-pipeline".
The settings above will ensure that your metadata is stored in Elasticsearch as rich data types - making search via tools such as SwiftStack Client more powerful.
For more detail on this topic, see JSON Metadata Indexing and Linked Data and the Rename Processor Pipeline.
Setting up SwiftStack Metadata Validator
SwiftStack Metadata Validator is packaged as an RPM for Enterprise Linux 7.
- You can always download the latest release by heading to https://cloud.swiftstack.com/v1/AUTH_swiftstack-metadata-validator/releases/latest.html.
- You can see a list of all releases at https://cloud.swiftstack.com/v1/AUTH_swiftstack-metadata-validator/releases/.
The middleware needs to be installed on all of your SwiftStack proxy nodes.
You can choose to install the web service anywhere you like, but the suggested deployment below will install it on your proxy nodes.
Note
The validator must be installed on machines running Enterprise Linux 7. If your proxy nodes run on another operating system, you should install the web service on seperate machines.
Prerequisites
To install the validator, you should have already installed a SwiftStack cluster.
If you would like to use it alongside SwiftStack Metadata Search, you should also set up your Elasticsearch cluster beforehand.
You will then need some credentials:
- The localadmin (or other administrative user) login for your SwiftStack Controller;
- A storage user, which will be used as a service account by the web service if you decide to use the Web Service API.
- Your Elasticsearch credentials, if any are required.
Note
The Web Service API can be used to validate metadata without making a object API request. This may be useful, for example, if you would like to create an application that allows users to set and validate their own metadata before trying to upload it to Swift.
For this to work, the storage user above must have read access to any accounts or buckets/containers you decide to validate.
If you do not plan to use this feature, no special access is needed.
Install SwiftStack Metadata Validator
Perform the steps below on all of your proxy nodes over SSH:
Download the RPM package. The command below will always download the latest version.
$ curl -O $( curl -s https://cloud.swiftstack.com/v1/AUTH_swiftstack-metadata-validator/releases/latest.html | perl -pe "s/^.*URL='//; s/\.rpm.*/\.rpm/" )
Install the RPM (use the correct version below):
$ sudo yum localinstall swiftstack-metadata-validator-<VERSION>-1.x86_64.rpm
Configure SwiftStack Metadata Validator
The easiest way to configure the validator is to use the
ssmv-config-helper.sh script. This will:
- Install the middleware.
- Configure the web service.
- Start the web service.
Note
If you provide the --elasticsearch-url option, ssmv-config-helper.sh
will also add a Rename Processor Pipeline
to your Elasticsearch cluster, allowing the validator to process
Linked Data.
Use of the pipeline is entirely optional, and we recommend providing this option if you are using SwiftStack Metadata Search.
- For more information on Linked Data, see Linked Data and the Rename Processor Pipeline.
- For more information about configuring SwiftStack Metadata Validator, see Advanced Topics.
If you are happy to proceed, run ssmv-config-helper.sh, providing your
storage user credentials gathered in Prerequisites, and optionally the URL
of your Elasticsearch cluster.
$ /opt/swiftstack-metadata-validator/deployment/ssmv-config-helper.sh \
  > --swift-user=<USER> --swift-password=<PASSWORD> \
  > --elasticsearch-url=http://<ELASTICSEARCH_HOST>:<ELASTICSEARCH_PORT>
Configure Middleware
Once you have installed the RPM and run ssmv-config-helper.sh on every
Swift proxy node in your cluster, you will need to configure the middleware in
your SwiftStack controller.
Log in to your SwiftStack controller, over SSH, as root.
Enable the Custom Middleware feature with the commands below:
# . /opt/ss/etc/profile.d/01-swiftstack-controller.sh
# m feature add custom_middleware localadmin
Log in to your SwiftStack Controller's web interface as localadmin.
From the Middleware tab, click Add Custom Middleware (at the end of the page).
In the New Custom Middleware page, set:
- Name to "ssmvmiddleware";
- Middleware Config to the below:
paste.filter_factory = ssmvmiddleware:my_filter_factory
ssmv_endpoint        = http://localhost:3000
ssmv_prefix          = com-swiftstack-ssmv-
Click Submit, and then click View Pipeline Placement.
Drag the ssmvmiddleware to the end of the proxy pipeline, as shown below.
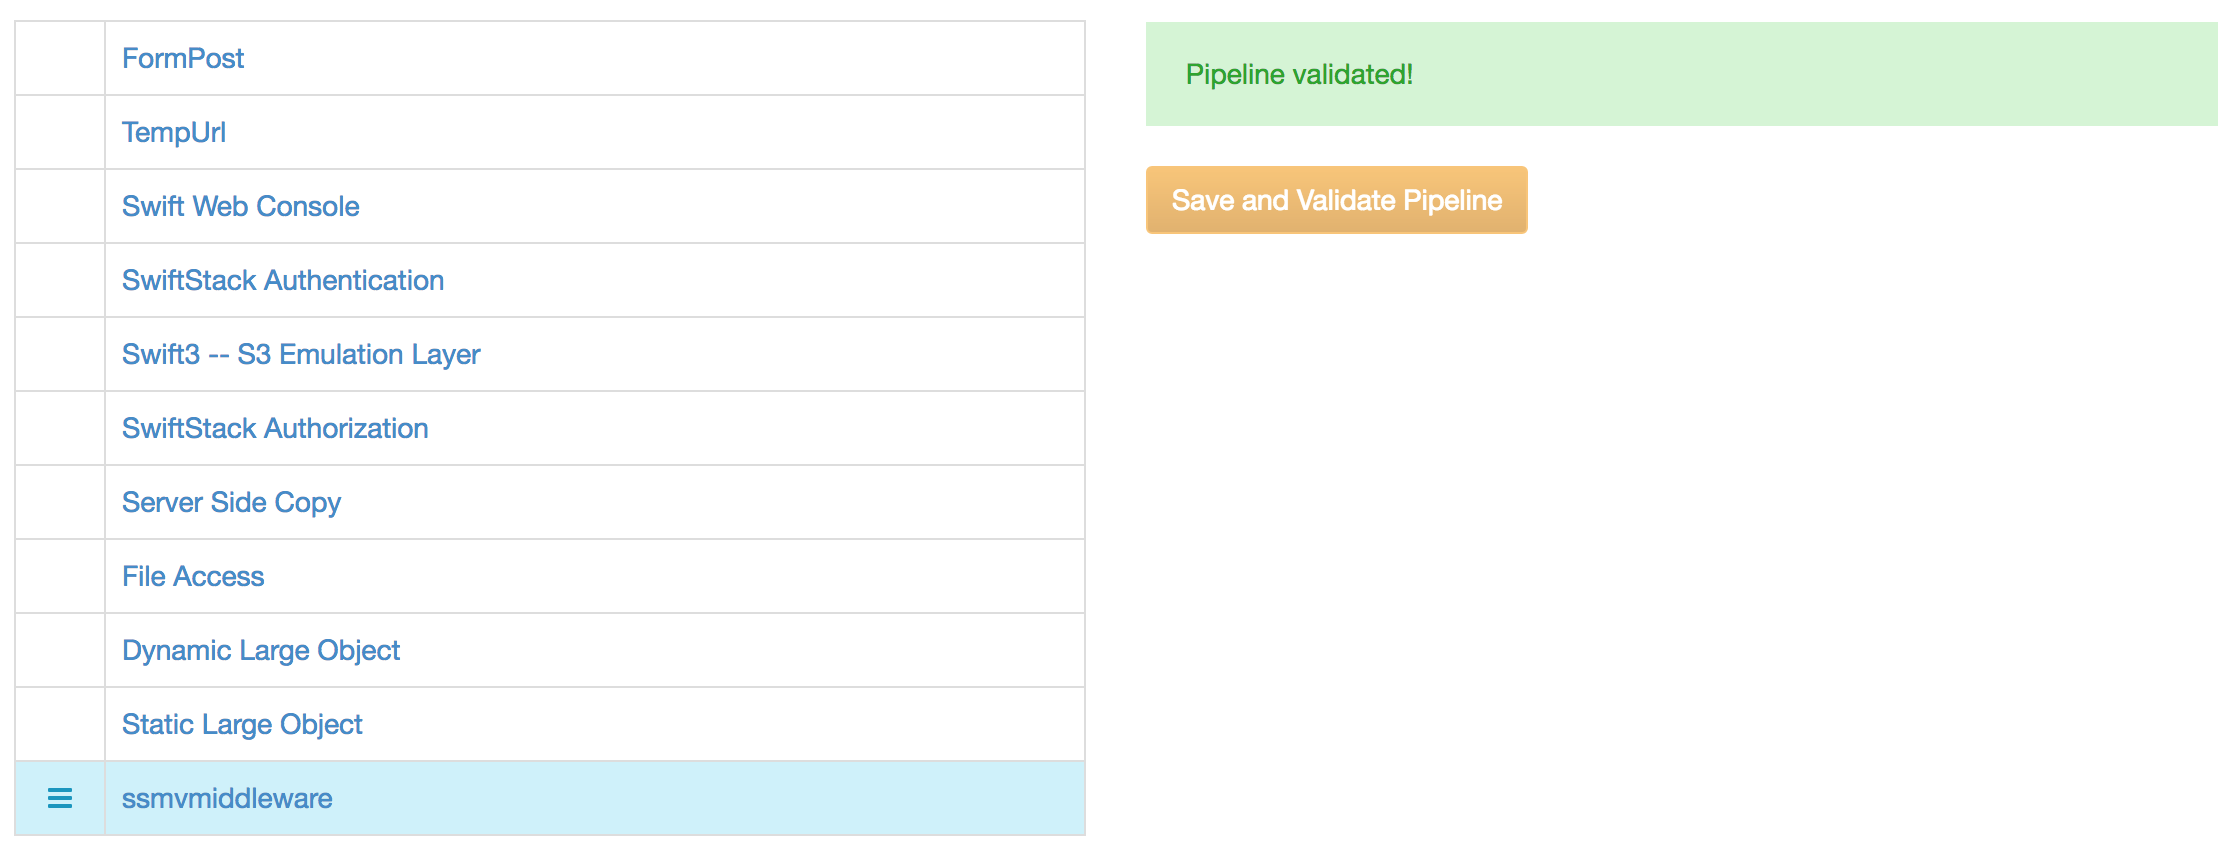
To finish, click Save and Validate Pipeline.
You will need to deploy your configuration to the cluster for these changes to take effect.
Using SwiftStack Metadata Validator
To validate metadata, you should:
- Create a JSON Schema describing valid object metadata.
- Upload the schema to a publically accessible web server.
- Add the metadata key
com-swiftstack-ssmv-schemato a storage account or bucket/container, set to the URL of your JSON Schema.
In the example below, we'll set up validation and metadata search for a Swift bucket/container. To do this, we will:
- Create two buckets/containers: one for our schema, and one for our object data.
- Set up a SwiftStack Metadata Search mapping for the data bucket/container.
- Upload a JSON Schema to the schema bucket/container.
- Add the metadata key
com-swiftstack-ssmv-schemato the data bucket/container, set to location of our JSON schema in Swift.
Bucket/Container Setup
First, add an Elasticsearch index to hold our metadata. In the below example, we've named the index swift_data:
$ curl -X PUT http://<ELASTICSEARCH_HOST>/swift_data
If you don't have a storage account ready for use with the validator already, you should now create one in your SwiftStack controller.
Note
Any user or account can be used for validation, not just the one used to Configure SwiftStack Metadata Validator.
That said, if you would like to use the Web Service API to validate metadata before making a object request, the service user set up in Prerequisites must have read access to any accounts or buckets/containers you decide to validate.
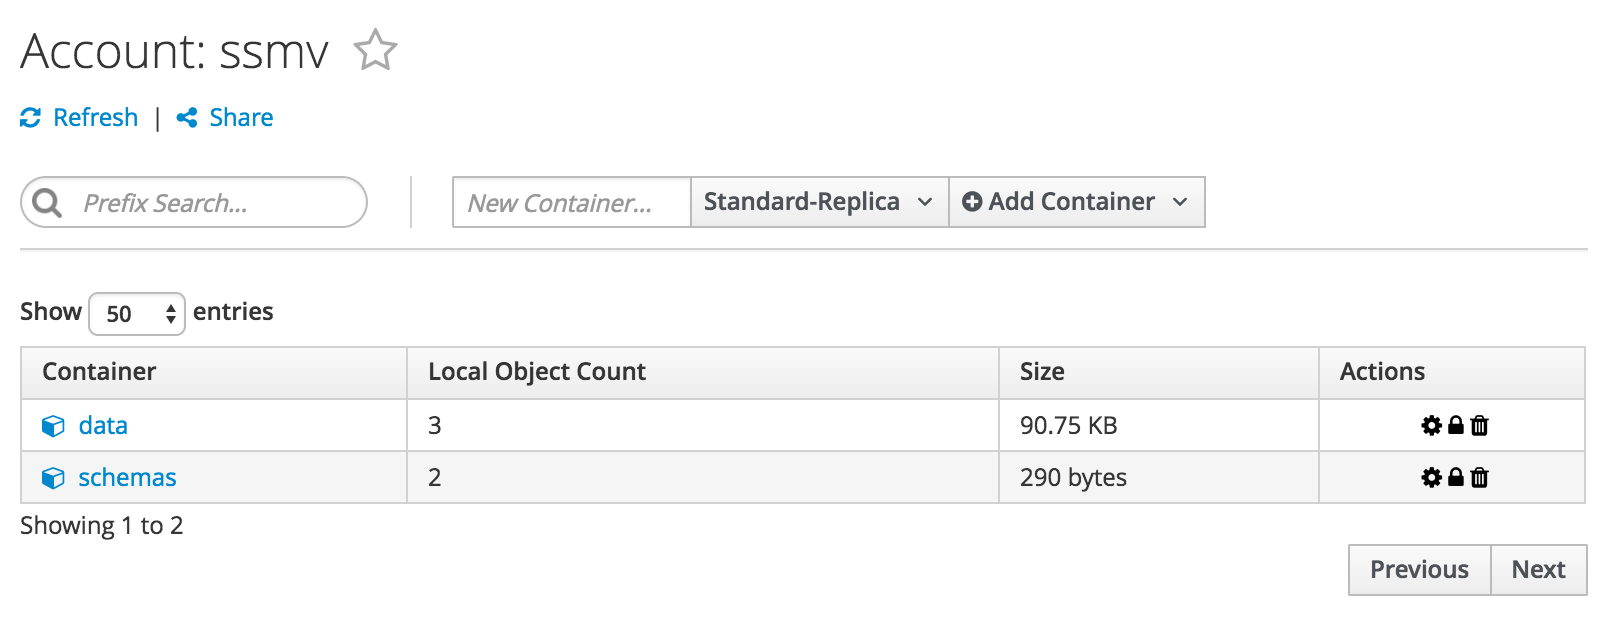
Create two buckets/containers within your storage account: schemas, and data:
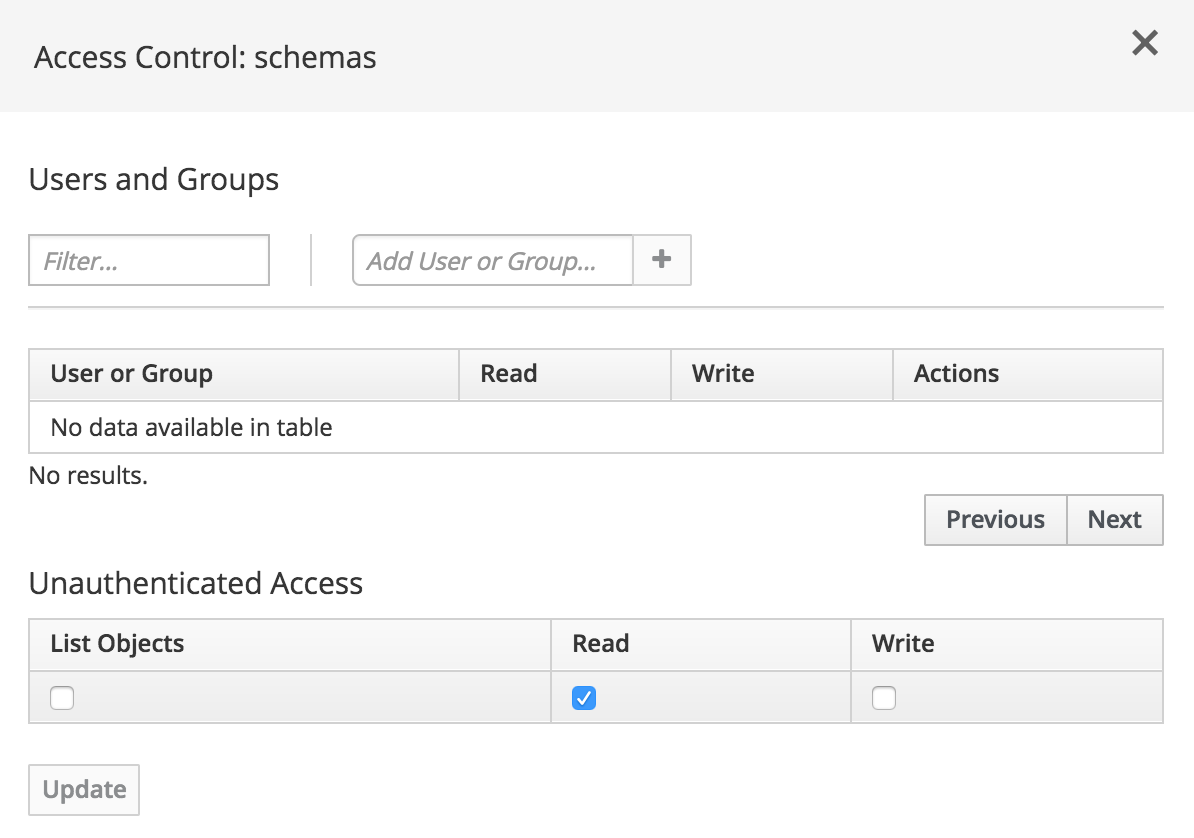
JSON schemas must be publically accessible. Set a public read ACL on the schemas bucket/container:
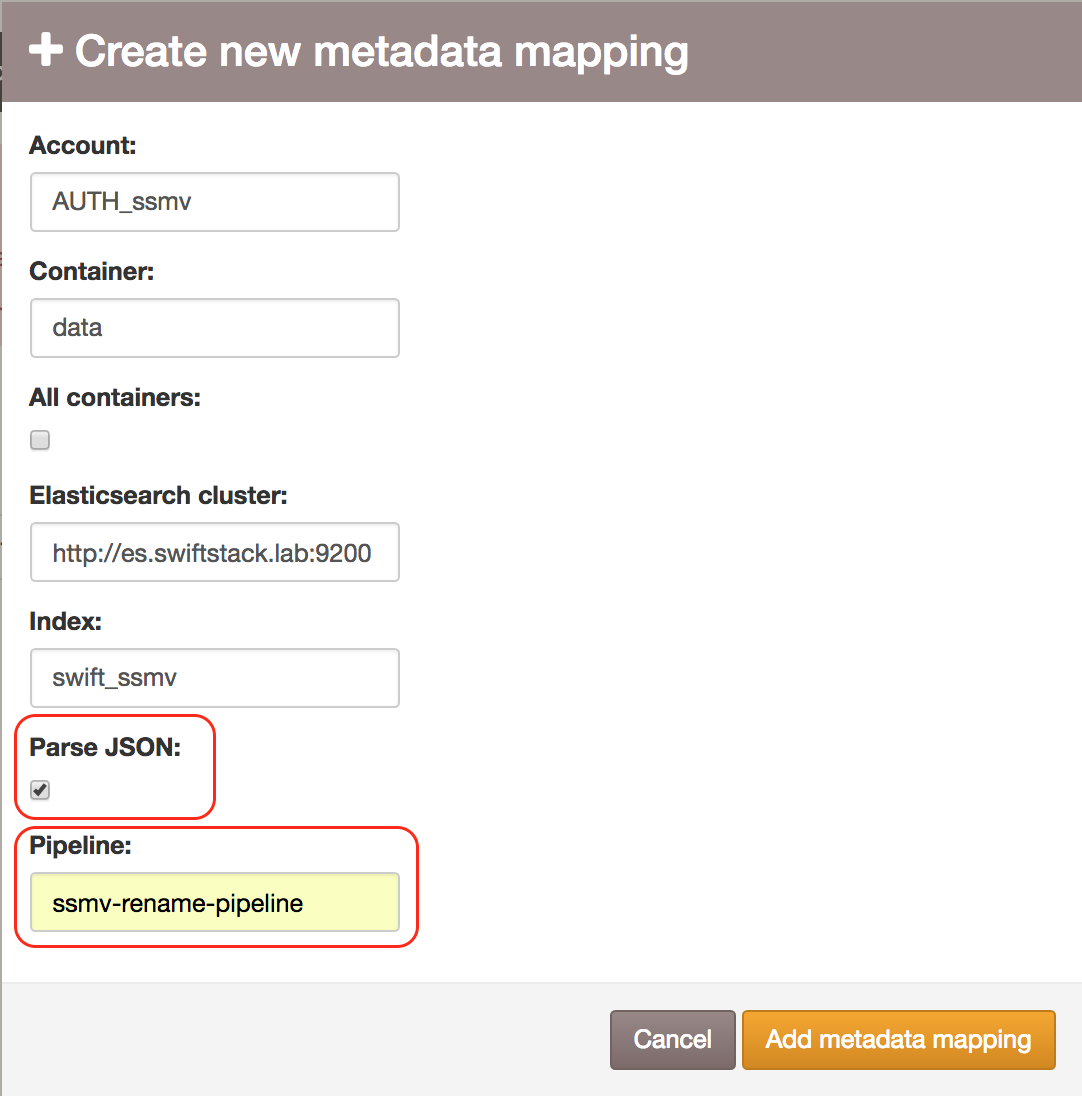
Finally, follow the steps in SwiftStack Metadata Search to add a metadata mapping for the data bucket/container. When setting the mapping up, we recommend that Parse JSON is enabled.
If you set up a Rename Processor Pipeline using the --elasticsearch-url
option to ssmv_config_helper.sh, you should also ensure your mapping uses
it by setting Pipeline to "ssmv-rename-pipeline" here.
Upload a JSON Schema
Create a text file on your workstation, called "age.json", with the text below:
{
    "title": "Test Schema",
    "properties": {
        "age": {
            "type": "number",
            "minimum": 0
        }
    }
}
...and upload it to the schemas bucket/container.
Note
The validator treats object metadata keys as top level properties in a JSON object. If possible, it will also treat metadata values as JSON (and treat them as strings if not).
So, for example, this metadata:
age:43givenName:"Charles"familyName:Dickenstags:[ "authors", "people" ]
... would be validated (and indexed to Elasticsearch) as:
{
  "age": 43,
  "givenName": "Charles",
  "familyName": "Dickens",
  "tags": [ "authors", "people" ]
}
age, givenName and tags are all valid JSON, so get parsed as
such.
familyName, however, isn't valid JSON (it's not quoted) - and so
becomes a string by default.
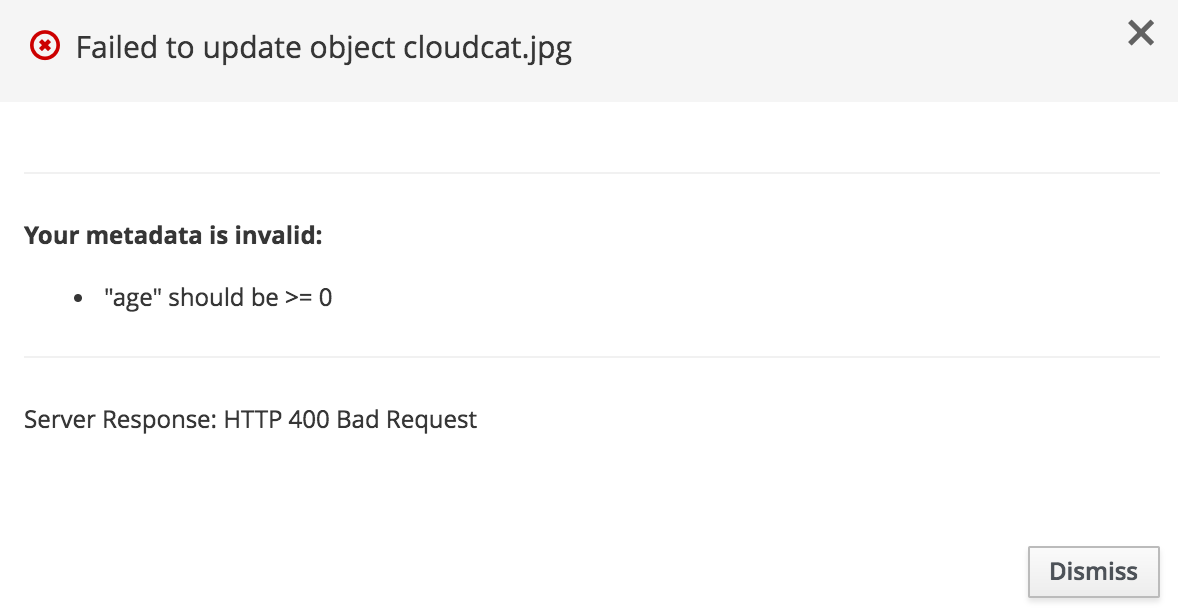
The schema above will look at the age metadata key, and if it's not a
number greater than or equal to 0, cause the cluster to throw a
400 Bad Request error back to the uploading client.
Now, add a metadata value, com-swiftstack-ssmv-schema, to the data bucket/container, with the URL of your JSON schema in Swift.
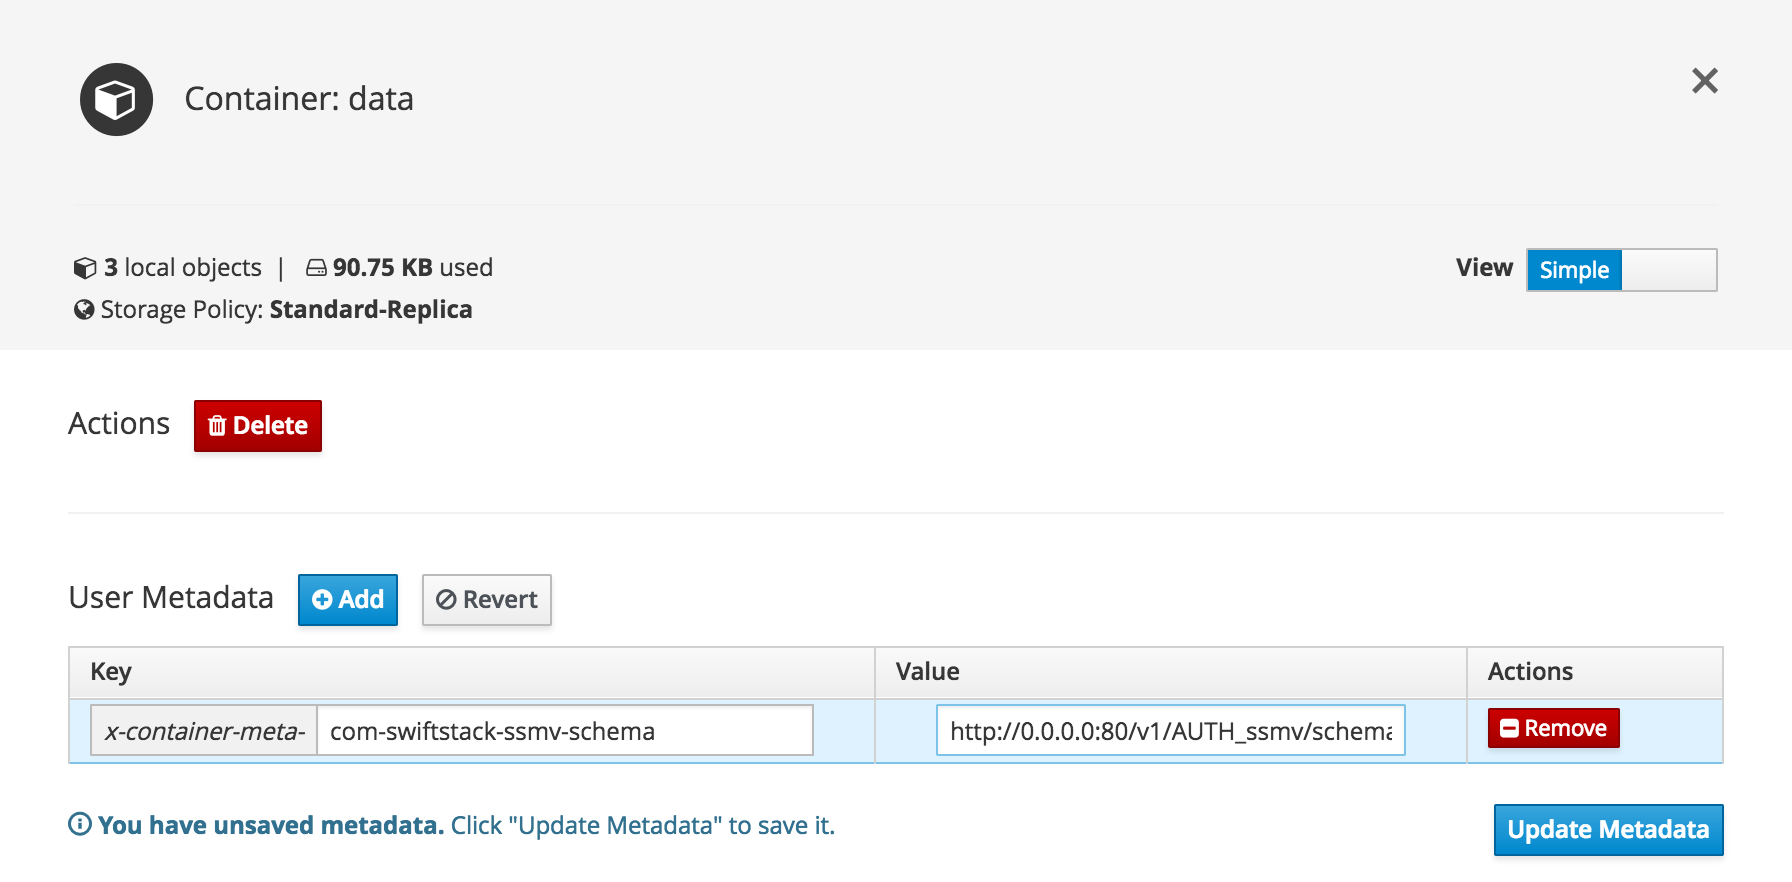
From this point onwards, object metadata within the data bucket/container will be
validated using the age.json schema.
Upload an Object to Swift
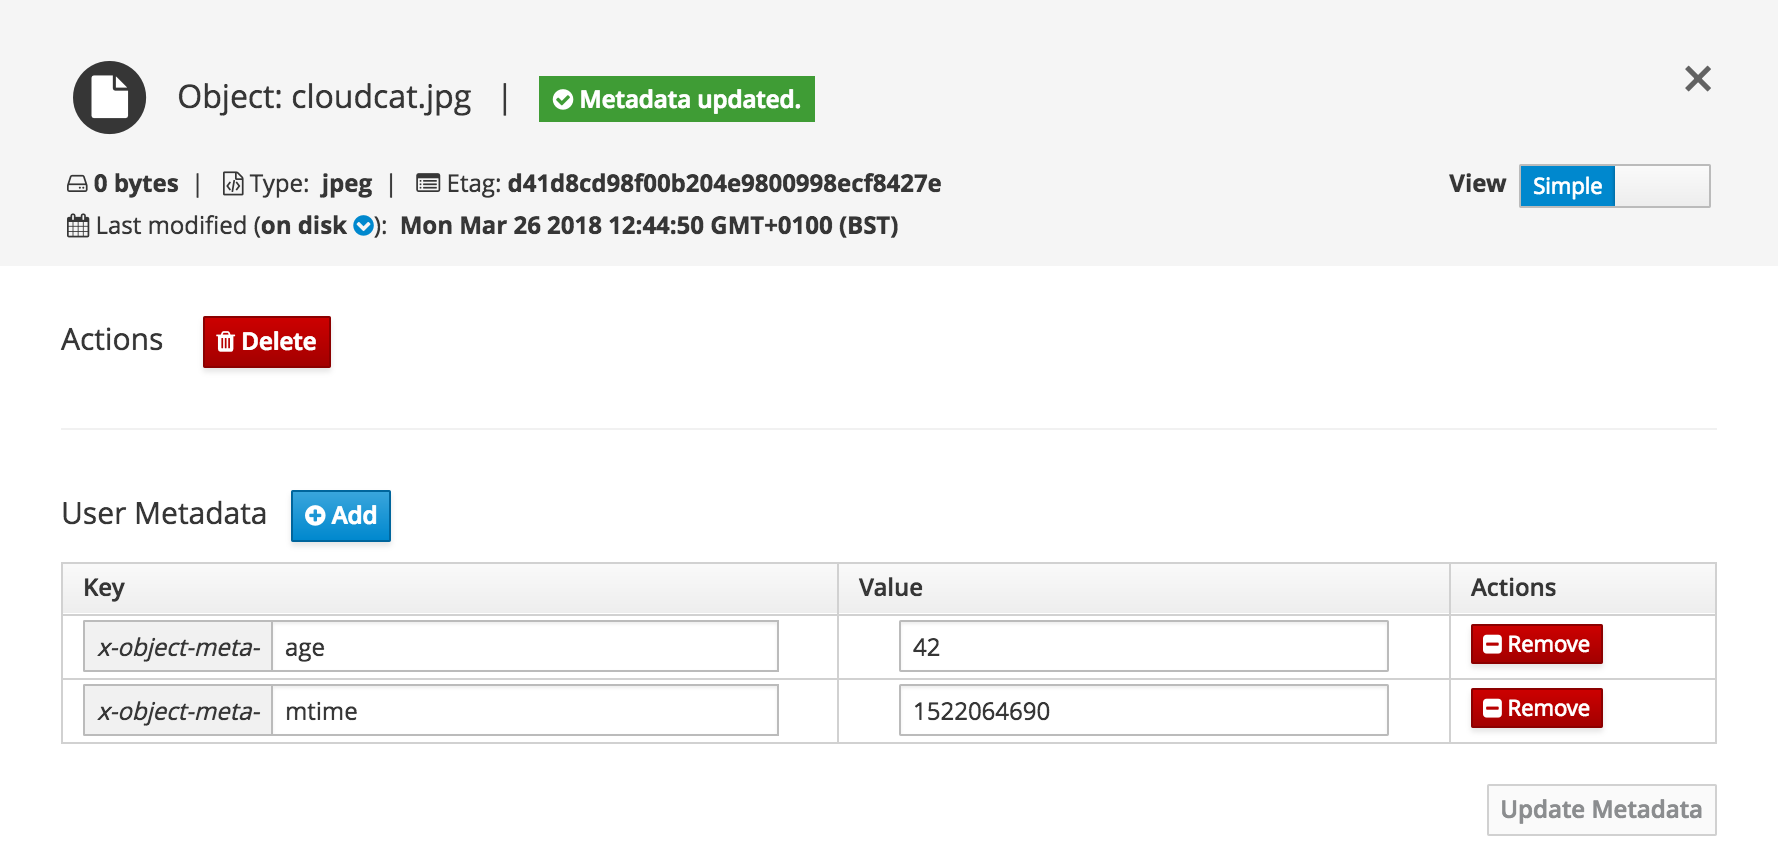
Upload any file you like to the data bucket/container. In the examples below, we're using a file called cloudcat.jpg.
The schema we set allows us to upload objects freely, unless they contain a metadata key named age. In this case, it ensures that age is a number, and that it is at least zero.
Break the rules by editing the object properties and setting age to -1 as below.
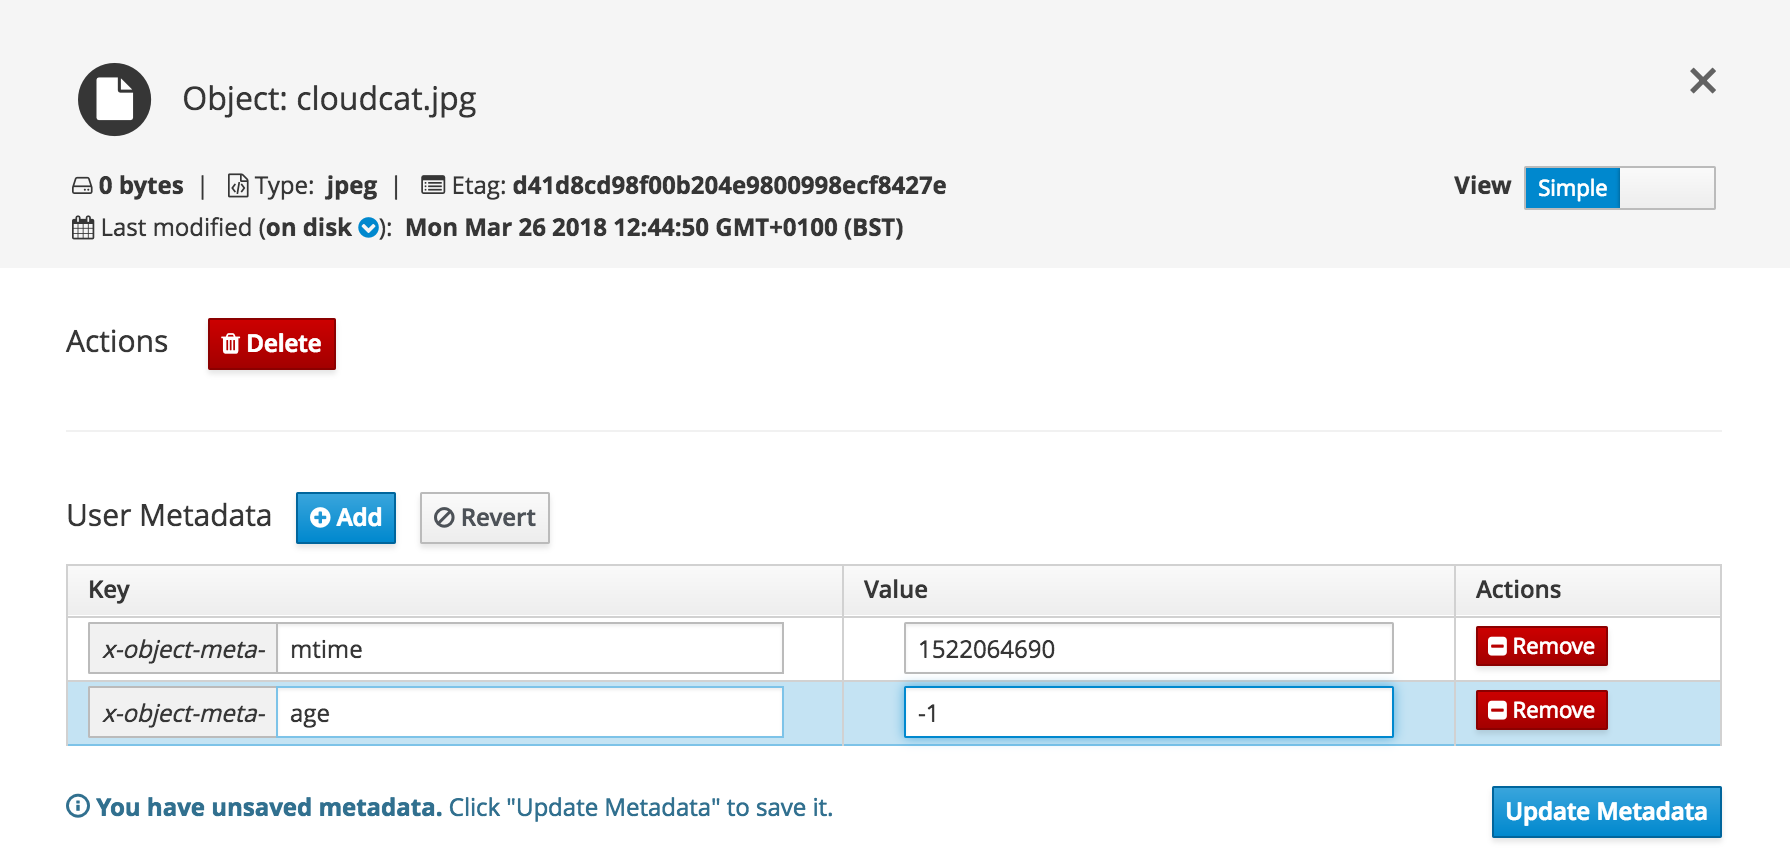
On clicking Update Metadata, you should see your change rejected by Swift:
Fix the metadata so we have a positive value for age, and update again:

...this time, your metadata should be allowed into the object store:
Advanced Topics
After you have installed the RPM, you'll find more documentation at
/opt/swiftstack-metadata-validator/docs/html/README.html
... on your nodes.
The local documentation covers a number of more advanced topics, beyond what we cover here.
Some places of interest might be:
- More on writing JSON schemas: /opt/swiftstack-metadata-validator/docs/html/user_guide.html
- Full Deployment Guide (including configuration reference): /opt/swiftstack-metadata-validator/docs/html/deployment.html
- Architecture Guide: /opt/swiftstack-metadata-validator/docs/html/arch_design.html
You may also be interested in some more advanced usage:
Local Processes
The SwiftStack Metadata Validator web service runs on proxy nodes as a daemon, controlled by systemd. On each node, it listens on TCP port 3000 for incoming requests from the validator middleware.
If the metadata validator service is down, object storage API requests to an
account or container tagged with a JSON schema will fail with HTTP 502 Bad
Gateway.
- The log file for the web service can be found at
/var/log/swiftstack-metadata-validator.logon each proxy node.- You can stop, start, restart, or check the status of the web service using the
systemctlcommand.
For example, to check the service status on a proxy node, run the below:
# systemctl status swiftstack-metadata-validator
To restart the service, run:
# systemctl restart swiftstack-metadata-validator
JSON Schema Overrides
In the example above, we set up validation on a bucket/container, but you can also enforce validation at the account or object level.
- To enforce validation for an entire account, set the metadata key
com-swiftstack-ssmv-schema, on the account, to the URL to your JSON Schema.- To enforce validation for an entire container, set the metadata key
com-swiftstack-ssmv-schemaon the container to the URL to your JSON Schema.- To enforce validation for a specific object, supply the metadata key
com-swiftstack-ssmv-schema, set to the URL to your JSON Schema, along with yourPUT,POST, orCOPYAPI request.
The JSON Schema location can be overridden:
- Containers tagged with a JSON schema in this way will override that set for the parent account.
- Objects uploaded with a JSON schema location will override any set for the parent container or account.
Additionally, if at any level - account, container, or object -
com-swiftstack-ssmv-schema is set to an empty string, no validation will
be performed.
Web Service API
If you're writing applications that use Swift, you can use the Web Service API directly to validate your data, and to find out which JSON schema is in use for a given storage account or bucket/container.
For example, if you're writing an application that allows users to edit metadata before upload, you might want to
- Validate their metadata without trying to upload it to Swift;
- Find out which JSON schema should be used for an account or bucket/container, in order to validate things yourself, or to build a suitable input form.
You can find the Web Service API Reference alongside the other docs at
/opt/swiftstack-metadata-validator/docs/html/api_ref.html
This guide also documents the HTTP responses that will send back if your metadata can't be validated for any reason.
JSON Metadata Indexing
By default, SwiftStack Metadata Search indexes metadata values to Elasticsearch as strings.
When setting up Metadata Search Mappings in your SwiftStack Controller, we suggest you make use of the Parse JSON setting to alter this behaviour.
When you enable Parse JSON:
- Metadata values that can be parsed as JSON are now indexed as JSON;
- Metadata values that cannot be parsed as JSON are treated as strings.
This allows you to index a richer set of data types (booleans and arrays, for example) - which allows for more powerful search tools.
When using SwiftStack Metadata Validator, it also means that vaidation is simpler; the metadata you validate and the metadata you search are treated the same way - as JSON.
Of course, this also changes the way in which metadata is indexed - something you may need to consider before deploying SwiftStack Metadata Validator.
The local documentation has more information in the architecture guide:
/opt/swiftstack-metadata-validator/docs/html/arch_design.html
Linked Data and the Rename Processor Pipeline
SwiftStack Metadata Validator allows you to use Linked Data.
Linked data is a method of associating semantic meaning with your metadata. For example, it allows you to state not only that the author of a book is Dickens, Charles - but also to express that Dickens was a Person, who might be described by another resource held somewhere else on the internet.
With JSON, linked data can be expressed as JSON-LD. To do this, a special property called the context is added to an existing JSON document. Rather than forcing you to write all of your JSON as complex linked data, the context allows you to specify the location of another JSON document - typically as a URL - which describes and annotates your existing data.
To specify a context in JSON-LD, you must add an object property named
@context. However, we can't use this directly in object metadata:
the S3 and Swift API sends metadata as HTTP headers, which (strictly speaking)
forbid use of the @ symbol.
To work around this, ssmv_config_helper.sh deploys a Rename Processor Pipeline
to your Elasticsearch cluster, named ssmv-rename-pipeline.
The processor serves only one purpose. When encountering any metadata named
com-swiftstack-ssmv-context
...it will rename it in Elasticsearch to
@context
...thus providing you with a way of attaching a JSON-LD context to an object.
To use it with Metadata Search, set the Pipeline option to "ssmv-rename-pipeline" when configuring your mappings.
For more information on linked data, see the local documentation on your validator node at /opt/swiftstack-metadata-validator/docs/html/user_guide.html.