Disaster Recovery Setup for SwiftStack Controller
First install and setup your primary controller according to Installing the SwiftStack Controller Software and Post-Install Setup (Standalone or Primary Controllers). Then install the controller software onto your standby controller according to Installing the SwiftStack Controller Software.
Finally, perform post-install setup on the recovery controller using either Setup Using the Web UI or Setup Using the CLI.
Disaster Recovery Setup Using the Web UI
Setting up a disaster recovery standby controller is like the process described in section Setup Using the Web UI.
You will use the same license that you used with the primary controller. However, you will check the “This is a standby controller” checkbox and make sure the HTTPS port for the primary controller is correct. Also, you will need to set some local hostname value that is different from the primary controller hostname contained in the controller license.
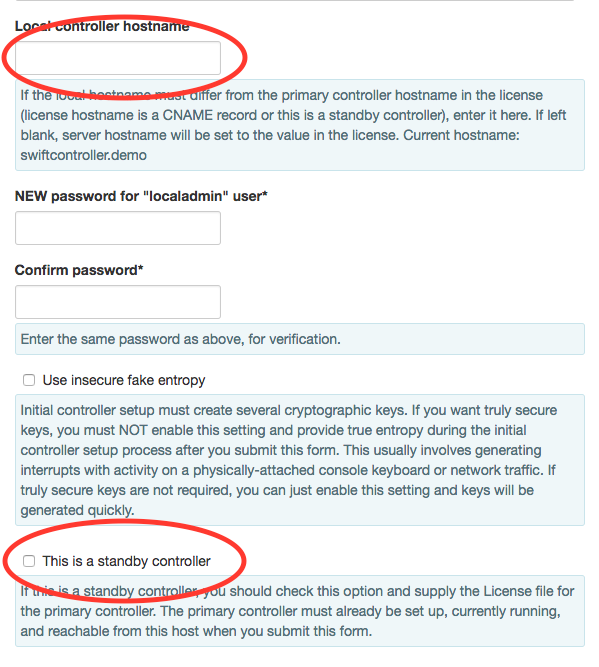
After you click “Submit”, the standby controller will register with the primary. You will need to click on the displayed hyperlink, possibly needing to log into the primary controller, to authorize the standby controller.
Warning
If you are using a self signed certificate for your primary controller, you will need to trust the SSL certificate on the secondary controller before clicking submit. See the Trusting a Self Signed Certificate for steps to complete
You need to make sure that the time is synchronized on both nodes. If the time is off, the promotion to a secondary controller will fail.
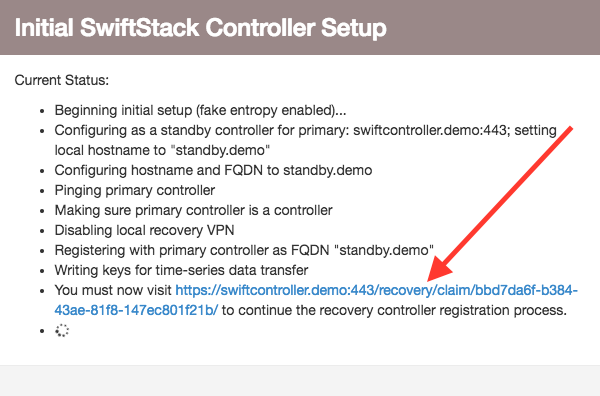
After you click on the link, the standby controller will finish registration with the primary and setup:
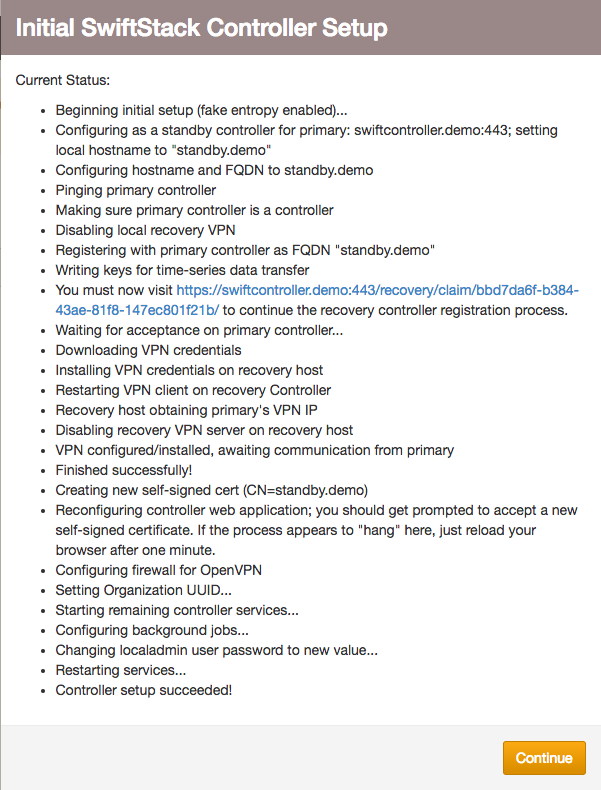
After clicking Continue, log in with the new “localadmin” user password you chose. Both the primary and standby controller provide access to online documentation about the Primary/standby controller feature. Please see the online documentation for how to use the standby controller.
Disaster Recovery Setup Using the CLI
You can also complete standby controller post-install setup using a CLI tool,
/opt/ss/deploy/current/ssman/bin/admin/manual_setup
You can run it with the “--help” flag to get a detailed usage message. It has command-line options that correspond to every element of the Web UI setup form.
All the discussion of section 3.4.1 applies here, but instead of web form fields, you provide input via command-line flags. The most basic invocation, for a standby controller, where you will be prompted to enter the new “ localadmin ” user password interactively, looks like this:
/opt/ss/deploy/current/ssman/bin/admin/manual_setup \
--license-file /path/to/primary/controller/license \
--is-standby --local-hostname RECOVERY.SERVER.HOSTNAME
You would see output similar to this:
/opt/ss/deploy/current/ssman/bin/admin/manual_setup --license-file swiftcontroller.demo.lic --is-standby --local-hostname standby.demo
Enter a NEW password for "localadmin" user:
Same password again (for confirmation):
Beginning initial setup (using real entropy so you should generate kernel interrupts, and this may take long time)...
Configuring as a standby controller for primary: swiftcontroller.demo:443; setting local hostname to "standby.demo"
Configuring hostname and FQDN to standby.demo
Pinging primary controller
Making sure primary controller is a controller
Disabling local recovery VPN
Registering with primary controller as FQDN "standby.demo"
Writing keys for time-series data transfer
You must now visit https://swiftcontroller.demo:443/recovery/claim/67c8263e-f8a1-46bf-a924-399e7e85e2b4/ to continue the recovery controller registration process.
After you visit the standby controller claim URL on the primary controller (possibly needing to log into the primary controller), the setup process will proceed on the standby controller. It looks something like this after it completes:
Waiting for acceptance on primary controller...
Downloading VPN credentials
Installing VPN credentials on recovery host
Restarting VPN client on recovery Controller
Recovery host obtaining primary's VPN IP
Disabling recovery VPN server on recovery host
VPN configured/installed, awaiting communication from primary
Finished successfully!
Creating new self-signed cert (CN=standby.demo) (requires entropy and may take a long time...)
Reconfiguring controller web application; you should get prompted to accept a new self-signed certificate.  If the process appears to "hang" here, just reload your browser after five minutes.
Configuring firewall for OpenVPN
Configuring SwiftStack Controller firewall using raw iptables
Setting Organization UUID...
Starting remaining controller services...
Configuring background jobs...
Changing localadmin user password to new value...
Restarting services...
Log in with the new “localadmin” user password you chose. Both the primary and standby controller provide access to online documentation about the Primary/standby controller feature. Please see the online documentation for how to use the standby controller.
Disaster Recovery Setup With Confidential Hostnames
Follow the steps of Controller Configuration, but with the additional flag shown in Setup With Confidential Hostnames
You can compute the hash using the following command:
python -c 'import hashlib, sys; print hashlib.sha256(sys.argv[1]).hexdigest()' the.actual.hostname
The output will look similar to below:
0c1109c3a5a7d4ae08b79c006f1e3b1892a73349e0ccd97d960799320734cba5
You would include one additional command-line flag when running manual_setup:
--primary-controller-hostname the.actual.hostname