Networking, Load Balancing
Network Rules
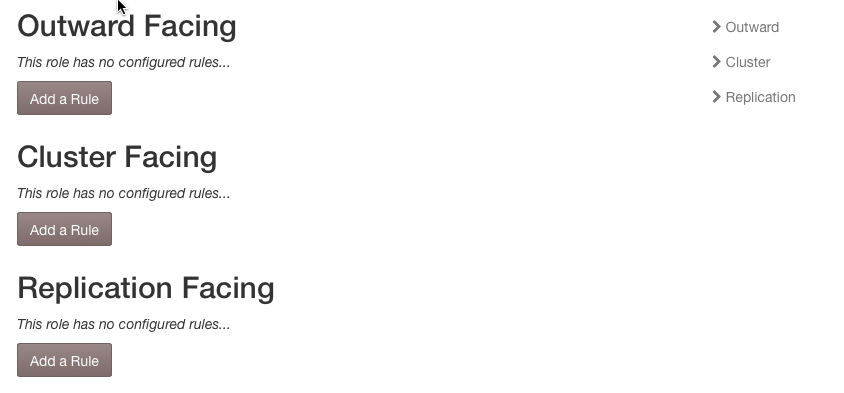
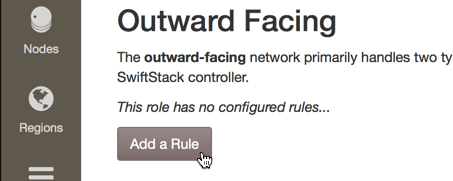
The Networks tab under Settings on the Manage Cluster page provides a place to define rules about which interfaces should be used for outward-facing, cluster-facing, and replication purposes. This feature was designed to make the ingestion of large numbers of nodes easier. See Node Network Configuration for more explanation on nodes' interface needs.
A cluster's Outward Facing networks are also used (and required) when setting up the SwiftStack Round-robin DNS Load Balancer feature. When an interface rule is referenced by a Round-robin DNS Group, it may not be deleted, and may only be edited to be larger (have a smaller number of subnet mask bits).
Adding, Editing, Ordering, and Deleting Rules
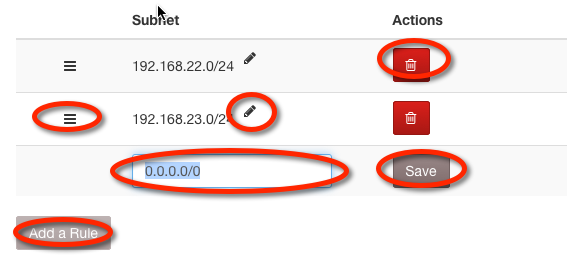
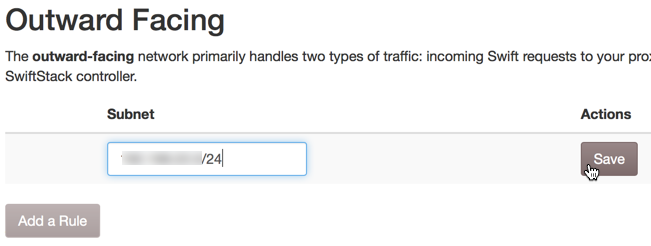
To add a rule, click the Add a Rule button. Edit the Subnet field by clicking on the field or its pencil icon and editing the contents of the field. Changes are saved by moving away from the field. Order the rules by dragging and dropping the handle on the left of the row. Delete a rule by clicking its Delete button.
Note
Rules with Subnet IP of 0.0.0.0 and/or Subnet Mask Bits of 0 will be ignored.
Load Balancing
The load balancing tier's purpose is to distribute AWS S3 and Swift API client requests evenly among members of the proxy tier.
Enabling load balancing can manged on the cluster configuration pane. See: Cluster Network Configuration
No Load Balancer and External Load Balancing
No Load Balancer
A single-node cluster does not need a load balancer at all, as all its requests go to a single proxy server. In this case, select No Load Balancer and put the node's outward-facing IP address in the Cluster API IP Address field.
External Load Balancer
An external, commercial load balancer (F5's, NetScaler's, etc.)
may be used. When a commercial / external load balancer is used, SwiftStack
configures the proxy servers to present a healthcheck URL for each of the
proxy nodes that can be used by the external load balancer. To configure the
cluster to use an external load balancer, select
External Load Balancer and put the load balancer's outward-facing
address in the Cluster API IP Address field.
The load balancer can verify that each proxy is working by accessing its
healthcheck URL, which is simply /healthcheck on each proxy server, e.g.
https://1.2.3.4/healthcheck.
For any questions about load balancing, contact SwiftStack Technical Support for assistance.
SwiftStack Load Balancer
SwiftStack Load Balancer Configuration Overview
To support fully horizontal throughout, you can use the SwiftStack Load Balancer option in combination with your existing DNS infrastructure. The SwiftStack Load Balancer distributes run traffic through multiple SwiftStack Nodes. With this load balancing solution, you can easily achieve hundreds of gigabits of aggregate upload throughput.
Round-robin DNS and virtual IPs
Unlike naïve round-robin DNS, this solution provides high availability. If a proxy server's process stops responding to requests, process dies and stays dead, network goes down, loses power, or a network partition occurs, that proxy server's assigned virtual IP (VIP) will transition to another functioning proxy node; no DNS reconfiguration is required.
Round-robin DNS takes advantage of the fact that DNS query responses may contain multiple IP addresses, and clients customarily use the first IP address in the list. The "round robin" part means the DNS server changes which IP address is returned first in the list. This has the effect of spreading client requests across the various IP addresses because different clients will get different IPs first in the result list.
Configuration Prerequisites
We suggest you claim and configure all initial Swift nodes prior to configuring the load balancer, but this is not required.
To configure the SwiftStack Load Balancer, you must gather the following information:
A hostname for the cluster.
The set of all distinct layer-2 network subnets across all proxy servers in the cluster. Each of these subnets will need an RRDNS Group with an associated outward-facing Interface Configuration Rule defining the group's layer-2 subnet. For example, with two proxy servers with outward-facing IP addresses of
192.168.34.4/24and192.168.34.99/24, then there would be one layer-2 subnet of192.168.34.0/24. If there were two proxy servers with outward-facing IPs of192.168.34.4/24and192.168.28.7/24, then there would be two layer-2 subnets:192.168.34.0/24and192.168.28.0/24.How many virtual IP addresses (VIPs) you need per distinct layer-2 subnet identified in #1 above. In general, you want as many VIPs as you can have, subject to the following constraints:
- You should not have more total VIPs for a cluster than your DNS server can round-robin between.
- For each layer-2 subnet, you cannot have more VIPs than you have proxy nodes on that layer-2 subnet.
For example, if you have 7 proxy nodes on one subnet and 3 on another subnet, but your DNS server can only round-robin between 5, then you would want 3 VIPs in the first subnet and 2 VIPs in the second. If your DNS server could handle 10 IPs for one hostname, then you would create 7 VIPs for the first subnet, and 3 for the second.
The IP address value for each VIP. Each VIP must be a unique, otherwise-unused IP address in its group's layer-2 subnet. These are the IP address values which will be entered into your DNS server's configuration for round-robin serving.
What VRID values are available for each VIP on that VIP's layer-2 subnet. The SwiftStack Load Balancer uses VRRP to ensure that each VIP is bound to a functioning proxy server (for high availability). The VRRP protocol requires a unique Virtual Router ID (VRID) value for each VIP, and this value must be unique among all services utilizing VRRP on the layer-2 subnet. See the VRRP RFC 5798 for more details about the VRID. So for each layer-2 subnet identified in step #1 above, you must determine if any other network devices are using VRRP and find out what VRID values they are using and you must not use those VRIDs when configuring the VIPs.
Configuring the SwiftStack Load Balancer
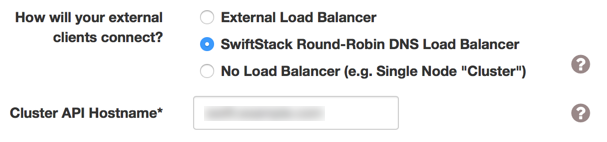
Select the SwiftStack Load Balancer radio button on the cluster configuration page and enter the full DNS name for the cluster in the Cluster API Hostname field. After clicking Submit Changes, you should be redirected to the cluster Load Balancer configuration page where you can finish configuring the load balancer.
Finish configuration using the new Load Balancer tab in the manage cluster interface by following these steps:
Create one outward-facing Interface Configuration Rule for each distinct proxy-server layer-2 subnet. See the Interface Configuration Rule documentation.
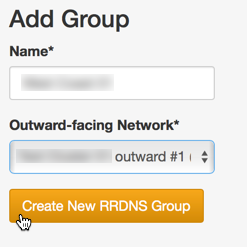
Create one RRDNS Group per distinct proxy-server layer-2 subnet. When you create an RRDNS Group, you associate it with an outward-facing Interface Configuration Rule and also give it a name to help you tell multiple RRDNS Groups apart during subsequent configuration.
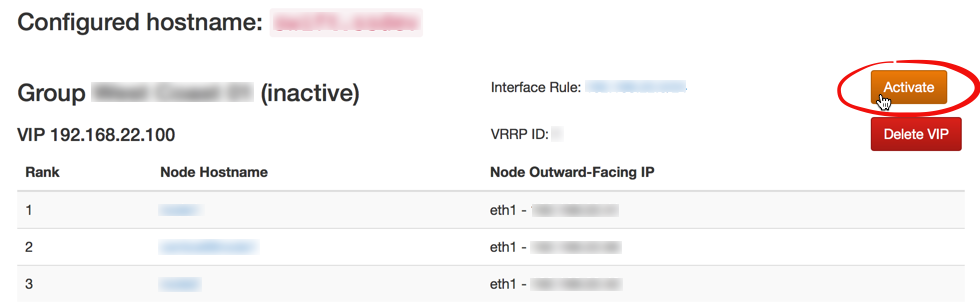
Each RRDNS Group is either "inactive" or "active". A created RRDNS group starts out "inactive", and cannot be activated unless certain constraints are met (if you try to activate an RRDNS Group too early, you will get an error message listing constraints not yet satisfied). An "inactive" RRDNS Group is ignored during cluster config pushes. Certain actions can later cause an active RRDNS group to become invalid (changing a proxy node's outward-facing interface, changing a proxy node's role, disabling too many proxy servers, etc.). When this happens, a warning message will appear, the RRDNS Group will remain active, and you will not be able to push a config to the cluster until the RRDNS configuration is repaired.
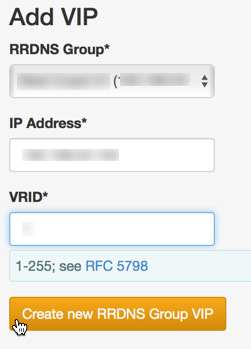
Create all RRDNS VIPs. Each VIP will be associated with an RRDNS Group, and the VIP IP address value must be "in" the RRDNS Group's Interface Configuration Rule's subnet. The SwiftStack Controller will automatically assign proxy nodes to RRDNS VIPs in order to maximize availability, taking into account node zone and region membership.
Activate each RRDNS Group. If certain constraints are not met, you will get an error message listing the unfulfilled constraints and the RRDNS Group will remain inactive.
Once all RRDNS Groups and VIPs are configured, and all RRDNS Groups are activated, you can push a config for the cluster. After the configuration push completes, each VIP will be a stable, highly-available endpoint for the Swift cluster that will remain functional, even in the face of failures.