python-swiftclient
Once your newly configured cluster is ready, it is advisable to run through a few exercises to become familiar with your cluster and test it.
Installing the Swift Command Line Client
A great way to access the cluster is with the Swift command line client. The Swift client can be installed on OS X, Windows, or Linux.
OS X
sudo easy_install pipsudo pip install --upgrade setuptoolssudo pip install python-swiftclient
Ubuntu
sudo apt-get install python-pipsudo pip install python-swiftclient
RHEL or CentOS 7.x; Fedora
sudo yum install python-setuptoolssudo easy_install pipsudo pip install --upgrade setuptoolssudo pip install python-swiftclient
RHEL/CentOS 6.x
sudo yum install python-setuptoolssudo easy_install pipsudo pip install --upgrade setuptoolssudo pip install python-swiftclient==2.7.0
Note
python-swiftclient version 2.7.0 was the last release to support Python 2.6.
Windows
If necessary, see the pip documentation for instructions on installing pip. Then:
pip install python-swiftclient
Note
If pip gives you an error related to "wheel", add --no-use-wheel after
install on the pip install command-line. This should only be necessary
for pip >= 1.5 and setuptools < 0.8, but this is unfortunately an easy state
to get into.
Note
SwiftStack does not recommend running the Swift command client from an enabled SwiftStack node. Please use a separate system to access the authorization URL.
Accessing Your Cluster from the Command Line
Once the swift client is installed you can access your cluster using a variety of commands. The basic syntax is: swift command [options] [args]
Three main values will be used with the commands.
- Auth URL (or API IP address if no hostname is set)
- Auth URL example: http://production01.acme.com/auth/v1.0
- API IP example: http://10.0.0.48/auth/v1.0
- Username of account on cluster
- User example: user01
- Password of account on cluster
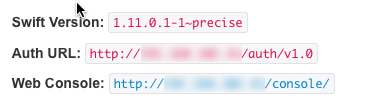
Finding the Auth URL
You can locate the Auth URL on the cluster's page. While signed into the SwiftStack Controller (https://platform.swiftstack.com/) click on the Clusters tab. Click on the desired cluster. That cluster's page will open. In the upper, right corner of the page will be the Auth URL.
Using the stat Command for Account Information
The stat command will display information about an account or object.
User Accounts
Using stat to find information on a user's account requires passing in the Auth URL, the account username and the account password. The example below uses:
swift [-A *Auth URL*] [-U *username*] [-K *password*] stat
swift -A http://production01.acme.com/auth/v1.0 -U user01 -K password stat
Note
If you did not set a cluster hostname on the configuration page then you can also use the API IP address (in the example we used 10.0.0.48):
swift -A http://10.0.0.48/auth/v1.0 -U user01 -K password stat
The stat command will then return basic information about the user01's account:
      Account: AUTH_user01
   Containers: 0
      Objects: 0
        Bytes: 0
Accept-Ranges: bytes
  X-Timestamp: 1364147836.58268
   X-Trans-Id: tx8d61d538ded94c7caebbb2d947a29435
 Content-Type: text/plain; charset=utf-8
Set Environment Variables
Set the "Auth URL", username and password for the cluster as environment variables to reduce human errors and make the tool even faster and easier to use.
For example in a bash profile:
export ST_AUTH=http://production01.acme.com/auth/v1.0
export ST_USER=user01
export ST_KEY=password
Using the stat Command for Containers
The stat command can also be used to display information about containers using:
swift stat <container name>
Using the upload Command
Using upload requires passing in the name of the container name to upload to and the name of file being uploaded:
swift upload <container_name> <file_to_upload>
When uploading large files use the built-in, multi-part uploading function, Static Large Object (SLO).
swift upload --use-slo --segment-size 10000000 <container_name> <file_to_upload>
For example to simultaneously create a container called Pictures and upload a file called HolidayPhoto.JPG type:
swift upload Pictures HolidayPhoto.JPG
To upload a large file with multiple simultanious threads.
swift upload --use-slo --segment-size 10000000 Pictures HolidayMovie.MOV
Note
Verfy the upload using the stat command:
swift stat Pictures
Which returns something similar to:
      Account: AUTH_user01
    Container: Pictures
      Objects: 1
        Bytes: 7251299
     Read ACL:
    Write ACL:
      Sync To:
     Sync Key:
Accept-Ranges: bytes
  X-Timestamp: 1364148979.10367
   X-Trans-Id: tx51a61829992d42169561a5062830d2ca
 Content-Type: text/plain; charset=utf-8
Using the download Command
Using download requires passing in the name of the container name to download to and the name of file being downloaded:
swift download <container_name> <file_to_download>
For example to simultaneously download an object in Finances a file called plan.pdf type:
swift download Finances plan.pdf
Using the list Command to View Contents
The list command will display the contents of containers and accounts that are passed to it.
swift list <container_name>
List Contents in a Container
To list files in the container:
swift list <container_name>
In this example, the contents of the Pictures container is listed by using:
swift list Pictures

HolidayPhoto.JPG
List All Containers
To list all the containers for an account, use "swift list" with no options or args.
swift list
Using the copy Command to update Metadata
To update the metadata on an object use "swift copy". The -m option can be used multiple times in a single command.
swift copy -m key:value -m key:value <container_name> <object>
To remove an existing metadata value from an object leave the key value blank
swift copy -m "key:" <container_name> <object>